Last week I explained how to create an Access
VBA Custom Function in a
global module. This was something of a departure from what I covered in previous blog posts. All of the programming I had covered previously has been associated with a given form or report - what we refer to as a
Class Object. In this post we are going to take a step back and look at the general structure of a VBA
Project as a whole, and in so doing we will examine the concept and workings of
Scope.
VBA Projects
I have mentioned in the past that Access and VBA are two separate, albeit closely related, pieces of development software. When we create an access database, a VBA project linked to that particular database is created for us automatically. It is within this project that we create and store all the code relating to our database.
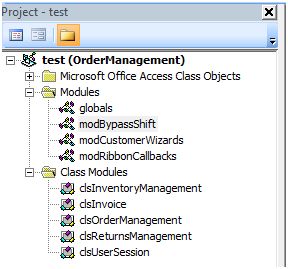 |
Figure 1: The VBA Project Explorer
showing folders for Class Objects, Modules and
Class Modules. |
|
The VBA project consists of three main elements: these are
class objects,
modules and
class modules. These can be viewed in tree diagram format via the VBA Project Explorer (see
Figure 1 right).
Class Objects
Class Objects contain code relating to elements in a form or report. We covered these in some detail in the
Learning Access VBA series of posts. As you may remember, code from class modules is generally triggered when a form or report event is triggered (for example, the
OnCurrent Event is triggered when the user moves into a record displayed on a form).
Modules
Modules, on the other hand are not associated with any particular form or report, but do contain variables, sub procedures and functions that can communicate with them in various ways. They are a convenient place to keep code which can be read, written to, or called from the class objects. Moreover, when declared Public, any given variable, sub procedure or function within a Module can be accessed from many different class objects (and sub procedures within class objects) elsewhere in the project. As such, modules help us organise and manage our code, thereby making our VBA project more logical and efficient.
Lets elaborate on this further. Suppose we have a sub procedure called deleteRecord stored in a module. It purpose is to delete a particular record from a particular table when called. The advantage of locating this code in a module is so different forms in the database can also make use of this same code. So rather than re-write the same section of code in each form, we write it once in a module, and call it whenever one of the forms needs to use it. As such, we not only write less code, and save time in so doing, but we can easily maintain and modify that code since it is located in one module. That is to say, if we want to change how the deleteRecord command button behaves in all the sharing forms, we only need update our code in one central place.
Class Modules
So far we have said little about
Class Modules, the third main element of a VBA Project. These are actually worthy of a complete series of blog posts in their own right (something which I may well do in the future). For now, however, let's just say they offer the programmer a way of creating their own custom objects made up of properties, methods and events. Like conventional modules, class modules also help the programmer organise and manage code, but in a way that is potentially more complex and powerful.
Scope
With the partitioning of class objects, modules and class modules, VBA Projects have the potential to become very large and complicated. On the one hand these different project 'zones' need to be self contained so something happening in one class module does not interfere with something happening in another elsewhere; yet on the other, they also need to exchange information and communicate. This is where the concept of
Scope comes in.
The concept of scope relates to the way in which different zones of a VBA Project partition the processing of data that occurs within and between each of those sections. We are going to illustrate how this works in relation to
variables and
sub procedure/function calls. Lets start with how variables behave within a form's object class.
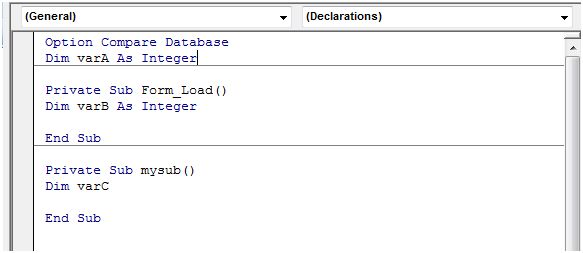 |
| Figure 2: A basic Class Object to illustrate Scope . |
Variables and Scope
The screenshot in figure 2 shows a class object containing two sub procedures,
Form_Load() and
mySub(). A total of three variables are declared within the class object, two of which, -
varB and
varC -are contained within sub procedures.
VarA on the other hand is declared above both sub procedures in what is known as the
General Declarations section. The difference in positioning has a direct effect on the scope of each variable. Let's examine this in more detail.
VarB is declared within the form's
Form_Load() sub. This means the
scope of
varB is
local to this sub, and can only be accessed by code
within it. As such, we can can only read and write to this variable from within the same sub procedure in which it is declared. So, for example, if we assign a value to
varB within the
Form_Load() sub, we will not be able to read that value from code executed within
mySub and vice versa. This is what is meant by a
local variable.
VarA on the other hand is written within the
General Declarations section outside of any sub procedure. The scope of any variable declared here is
class object wide. That is, it can be accessed from anywhere
within it's own class object. As such, we can assigned a value to
varA in the
Form_Load() sub, and then read that same value externally from
mySub. What we can't do, however, is access the variable from outside of this particular class object. To do this we need to declare a
Public Variable from a Module.
Public Variables
The scope of a public variable declared in a module is
project wide - that is
to say, it can be accessed from any
class object,
module or
class module in the project. Public variables are declared using the
Public Statement (as opposed to the usual
Dim Statement) in the module's
General Declarations section (see Figure 3 below for an example).
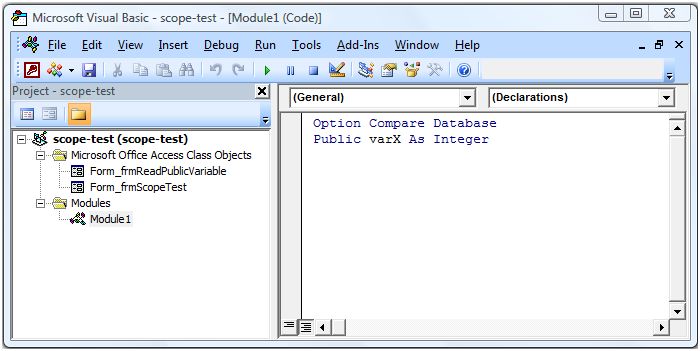 |
| Figure 3: The shows the Public Variable, varX, in the General Declarations section of Module1. |
As you can see, the VBA Project in Figure 3 contains two class objects (
Form_frmReadPublicVariable and
Form_frmScopeTest) and a module (
Module1). Since the variable
varX has been declared with the
Public statement in the
General Declarations section of
Module1, it can be accessed from
both class objects. As such we can assign a value to
varX in the
Form_frmScopeTest class object, and then read that same value some time later from a sub procedure in
Form_frmReadPublicVariable. However, the disadvantage of using public variables is that they make code potentially more difficult to debug, especially in large projects where the variable might be accessed from sub procedures in many different class objects, modules and class modules. To some extent we could say that public variables undermine the code management advantages from working in a partitioned VBA project. That said, they
can be a really useful programming tool if used carefully.
Scope and Persistence
Before we move on to look at sub procedure and function calls, it is important to say something about the nature of scope and persistence. In the context of scope, persistence is how long a value assigned to a variable lasts or
persists. How long, that is, before the variable value is lost and forgotten. So, for example, if we assigned a value to a local variable declared within a sub procedure using the
Dim Statement, that value will persist only as long as the sub procedure is running
(1). Once the sub has finished the value assigned to the variable no longer persists. Likewise if a variable is declared within the general declarations section of a form class object, any value assigned to the variable will only persist whilst that form is still open. Once closed the value is lost. Of course it is public variables which have the greatest persistence. Any value assigned to one of these will last until the database application is closed.
(1) There is an exception to this rule. We can declare the variable using the Static Statement instead of Dim. Doing so enables the value to persist, but only within the sub where it has been declared. The next time that particular sub executes, the previous variable value is remembered and can be read by code (providing that code is still within the same sub).
Scope and Sub Procedure / Function Calls
If you read my post on
Writing Custom Functions for Access VBA last week, you may already be familiar with the concept of
calling a function. You may recall how the
myPercentage function located in an external module was called from a sub procedure within a form's class object. You may also recall how we passed three
parameters to that function. The significance of being able to pass parameters in this way, is very important from the perspective of scope. That is to say, if the call
ing sub procedure needs to share a local variable with the call
ed function or sub, passing local data in the form of a parameter enables us to bypass the issue of scope. As such, parameters are a way of letting various parts of the VBA project share information and communicate without compromising the real need to keep the project strictly partitioned in an organised manner.
Lets examine a simple example of how passing a parameter, this time in a sub procedure call, can bypass the issue of scope:
Private Sub Command9_Click()
Dim varThis As Integer
varThis = 10
Call thatSub(varThis)
End Sub
Private Sub thatSub(argReceived As Integer)
MsgBox ("The argument received is: " & argReceived)
End Sub
Here we have two private sub procedures within the a form's class object. When the user clicks a command button, the Command9_Click sub procedure begins to run. It defines a local variable called varThis and assigns it with the integer value 10. The next line calls the thatSub sub procedure, passing the local variable varThis as the parameter. This call results in the execution of thatSub. Notice how the first line of thatSub contains the code argReceived As Integer within brackets. This is where the passed parameter (varThis) is received by the called sub procedure. The parameter which has been passed is now referred to as an argument, and it's value can be accessed from code within the receiving sub procedure. As such, when the second line of code in thatSub runs, a message is displayed ending with the value contained in argReceived (see figure 4 below).
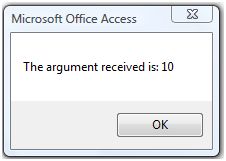 |
Figure 4: The message displayed from the
MsgBox method in thatSub. |
We see, therefore, that the value contained in what is a local variable has been passed to a different sub procedure which would otherwise have been outside that variable's scope.
Conclusion
In this post we have seen how the VBA project is partition into various zones, and how those zones are largely self contained in terms of data processing. This partitioning is maintained via a set of rules collectively known as scope, the advantage of which is the management of code within the project. Since there is a legitimate requirement for these zones to exchange information, the working of scope can be bypassed in a managed manner through the passing of parameters and receipt of arguments.


