Pages

Tuesday, 10 November 2009

Creating an Access 2007 Form from Scratch

This post complements yesterdays article on Customizing an Access Form. This time we are going to look at Creating an Access 2007 Form from scratch.

1/ Begin by clicking the Form Design Icon on the Create Ribbon. This opens a blank new form in Design View.

Access Form Design Icon
The Form Design Icon on the far right of the Create Ribbon.
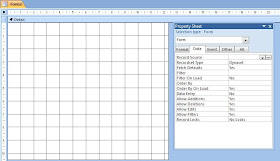

Access Form Design View
Form Design View and the Property Sheet.


2/ Before we start creating text boxes and other form controls, we are going to bind the form to an Access Table that has already been created. This is so Access knows where your forms' data is going to come from. We do this by setting the Record Source property. If the property window is not already open, click the property sheet icon in the Tools group of the Design Ribbon.

3/Select the Data Tab of the property sheet. This will display a grid of properties relating to your form's data. It is the Record Source property that we are currently interested in. Click the arrow to display a drop down list of potential database tables and queries that we can use. In this example we are going to use the table called tblAccounts, which we will select by clicking.
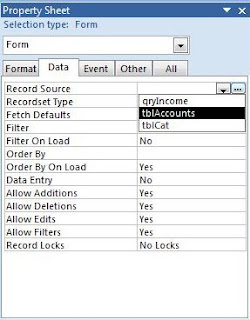
Record Source
Record Source property and the Property Sheet.


4/ We are now in a position to begin adding form Controls such as Text Boxes and Labels. These are located in the Controls group on the Design Ribbon. We shall now click on the text box icon and then move then cursor to the area of the form where we would like it to go. Then simply right click the mouse over this point. This will place the text box control on our form.

The Controls group of the Design Ribbon.
The Text Box control is on the far left of the image.


5/ We shall now set the Control Source property of the text box. This determines which field from the form's Record Source will be bound to the control. Do this by clicking the arrow to display a drop down list of field names from the table which we earlier selected as our record source. We shall choose the Description field. Like in stage 3, simply click the field name in the list to select.
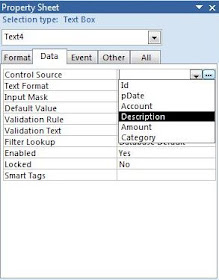
The Control Source Property.
Selecting a field name from the drop down list.


6/ You can now give your control a meaningful name. This is now displayed anywhere on the form itself, but it will be the name that you use to reference it later on in the design process. Do this by clicking the Other tab of the property sheet. The Name property should be at the top of the grid. Access gives it a default name such as Text1. You can simply type the name Description over this on the grid.
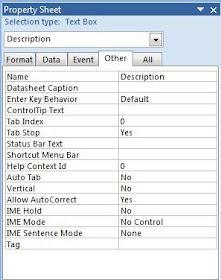
The Name Property for our text box control.


7/ We shall now change the Caption property of the label on the left of the text box. Unlike the Name property which we set in the previous stage, the Caption is displayed on the form to provide information to the user. In this case, it is going to tell the user that the information to enter in the text box is going to be "Description". Do this be selecting the label on the design grid by right clicking so that it goes orange. Next click the Format Tab on the property sheet and type in "Description" on the property grid. Alternatively you can click the label on the design grid to select, and then click inside the label to overwrite the old label caption directly.

You can now repeat this stage, adding as many text box controls as you need.
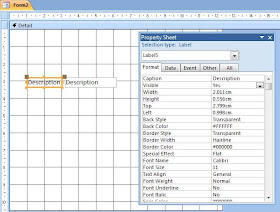
Caption Property
The Caption Property for our Label control.


8/ We will now finish off the form by entering a title. Do this by clicking on the Label control on the Controls group of the Design Ribbon. Then choose a position at the top of the grid, and click to add the label control to our form. We can now add our title text the same way as we entered the caption in the previous stage. Once we have entered the title caption, we can now increase the font size and make the text bold. Do this by right clicking the label to select, and entering a new Font Size of 24, and clicking Bold in the Font group of the Home Ribbon. You will also need to resize the label by double clicking the the notch on the labels border.

Monday, 9 November 2009

Customizing an Access 2007 Form

Creating a form has always been easy with MS Access. There is the user friendly Form Design Wizard, and in Access 2007 you can also set up a basic form by clicking a single Icon. These methods are a great way to get started, and at a basic level they might even be all you need. However, at more advanced levels you will more than likely want to modify the design of your form manually, or even set up an Access Form from scratch. This post will explain how to modify an existing form.

1/ If you have do not have an existing form to work on, begin by creating a simple form using the Access Form Wizard or clicking the Form icon
on the Access 2007 Create Ribbon.

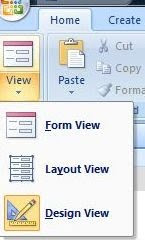
2/ When you open your form from the Navigation Window, it is ordinarily displayed in Form View. This is the view that you work in when you perform database tasks such as entering and updating records. We are going to be editing the form itself, and we do this by selecting Design View. Click the arrow under the Views Icon on the Home Ribbon. This gives you a selection of three views ie Form View, Layout View, and Design View. See screen below:


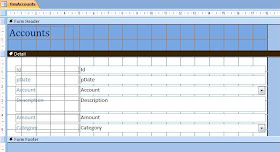
Select Design View from the drop down menu. A form in design view will look something like this:


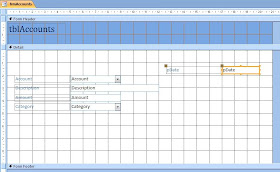
The labels are the boxes on the left, and the text boxes, which will contain the actual data from the table, are located on the right. You are now in a position to customise the appearance of your form.

3/ To delete an unwanted text box, simply select it by clicking on once and pressing the delete key. If you select the right hand box the label will also delete automatically, but you can delete the label without also deleting the text box if you wish.

4/ You can adjust the length of a label or text box. Click the label or text box to select, and then hover the mouse on the edge of the box where there is a notch half way along the border.


At first all the text boxes may change size together as a group. To remove this grouping so that individual text boxes can be adjusted, click the small square with the cross in the centre (this appears top left of the group as you can see in the screen shot above); then click Remove from the Control Layout on the Arrange Ribbon - see below:


5/ You can move text boxes and labels to different areas on the form. Simply click and drag the box.

6/ You might need to increase the size of the form by clicking and dragging the edge of the design grid. To increase the size of the form vertically click the upper edge of the blue border and drag downwards. To increase the width of the form, click the right hand edge and drag to the right. You can also reduce the form size by dragging inwards.

Saturday, 7 November 2009

The New Look of Microsoft Office Access 2007

The main reason for Access’s popularity and accessibility is its graphical user interface, along with its database tools and wizards that help users to create their database applications. These are easy to use for people new to database design, and speed up the development process for seasoned database professionals. Access 2007 saw a radical redesigning of this interface along with that for other packages in the Microsoft Office Suite, of which Access is a part. This new Microsoft Office Fluent User Interface TM was designed to make Microsoft Office Access 2007 more intuitive and user friendly. As Microsoft themselves put it Office Fluent is “ ... a user interface that makes it easier for people to get more out of Microsoft Office applications so they can deliver better results faster.”

The Access Ribbon

Instead of the old drop down menus of previous versions, Access now uses the Microsoft Office Ribbon. This works somewhat differently to the old Access Menus. There is a row of ribbon tabs with headings such as Home, Create, External Data, and Database Tools. Clicking on each tab presents you with its own individual ribbon with its own particular icons. Each icon on a ribbon is contained within a group of icons that perform similar tasks. So, for example, the Create tab has groups for Tables, Forms, Reports and Other.


The Access 2007 Create Ribbon

Ribbons are context sensitive. Access automatically selects the most suitable Ribbon for whatever you happen to be working on at the time. This might involve presenting you with a new ribbon that isn't normally available. An example of this is the Design ribbon which appears by default when you select the Design view for a database object such as a Form or Table.

Each Ribbon has sets of related icons organised into groups. The Create ribbon, for example, has a set of icons related to the creation of database objects. These icons are then grouped into items relating to Tables, Forms, Reports and 'Other'. Let's look at the Tables group.


There are four icons here relating to Access database Table functions: there is one to Create a New Blank Table, Create a Table using a Template, Create a table Linked to a SharePoint List, and Create a New Blank Table in Design View.

Icons are also context sensitive like the Ribbons themselves. So, for example, if you select a particular Ribbon which has function that is not relevant to what you are working on, the Icon for that function will be grayed out and cannot be clicked. This might happen if you are working on a Table and have the Database Tools ribbon selected. In this case there would be a couple of icons which would not be relevant (eg Convert Macros to Visual Basic), so they would not be available for selection.
The new Access 2007 Ribbon can be described as operating in an intuitive manner. As we have already seen the ribbons and icons that you are presented with are relevant to the work you are doing at any time so we do not need to look through different menu layers to find a particular item. In addition to this, the most commonly used features appear as large icons while those that are less common appear small. So while the Access 2007 Ribbon has many of the old features that were available in previous versions of Access (with a number of new features included), the new Ribbon is designed to be more user friendly.

The Office Button


The new Office Button is located in the top left hand corner of the Access Screen. It contains functions such as saving, opening, printing and creating new database files etc. This has enabled Microsoft to separate these file level functions from the document authoring features located on the Office Fluent Ribbon. Here is a screen shot of the menu items:


So to create a new database from the Office Button, you would simply click the New icon at the top of the list. This brings the Getting Started Screen which we will talk more about in the next chapter. Likewise to open an existing database you would just click the Open icon. This brings up a window where you can browse your folders to select the required database file. You may also notice the list of recent documents on the right hand side of the menu. These are the last database files that you have been working on. To open one of them simply click the file link.

The Quick Office Tool Bar


To the right of the Office Button is the Quick Office Toolbar. This gives users one click access to common commands such as Save, Undo, and Redo. In addition to these three default commands it is also possible to add additional ones from a list. As you can see in the image above, the Quick Office Toolbar has been customized so that the Open and Print Preview Commands are also available. To customize the toolbar yourself, click the arrow on the right hand side to produce the Customize Quick Office Toolbar menu.


Simply click a command to add it to the toolbar, or unclick the command for it to be removed. You can also select More Commands to bring up a dialogue box which will enable you to choose from a full list of commands.

Access Navigation Pane

The Access NAVIGATION PANE replaces the old database window. It is here where you will see the icons for all the Tables, Forms, Queries, and Reports that you create. When you want to open one of your database "objects", you just click on one of these icons, and the required object will open in the main Access window.


This image shows the Navigation Pane organized by object Type. Each section contains database objects of the same type. Double Clicking on the icon for tblCommunication would open the table with this name. As you will see further on in this e-book, you can open objects in a number of different views. In Design View, for example, you can create and edit the structure of a database table, whilst in Datasheet View you are mainly entering, deleting and editing the actual data contained within the table. Right click the icon to choose which view you require from the short cut menu.