 |
| Figure 1a: The Tab Control: Tab 1 "Personal". |
 |
| Figure 1b: The Tab Control: Tab 2 "Address". |
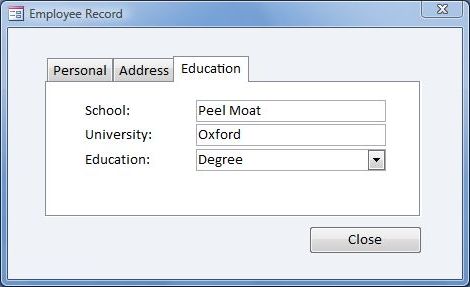 |
| Figure 1c: The Tab Control: Tab 3 "Education". |
As you can see, the Employee Record Form in figure 1 above contains a Tab Control which is comprised of three separate Tabs. The first tab shown in figure 1a has been given the caption, "Personal", and displays fields relating to the Employee's ID, Name and Date of Birth. The second tab in 1b relates to the employee's Address, and the third in 1c relates to Education. As such, we see how the Tab Control has enabled us to organize the information into logical categories, in addition to presenting that information in a tidy and easy to access format. In fact,we have condensed 11 fields to fit on a small Dialog form.
Lets take a look at how the form from figure 1 was created.
Lets take a look at how the form from figure 1 was created.
Adding a Tab Control
- To begin with I created a new form by clicking the FORM DESIGN icon. This is located in the FORMS group of the CREATE ribbon.
- I set the RECORD SOURCE property (via the DATA tab of the PROPERTY SHEET) to the appropriate table.
- I clicked the TAB CONTROL icon
 (located in the CONTROLS group of the DESIGN ribbon), and clicked a position for it to go on the form design grid. A blank Tab Control with two pages appears on the grid.
Figure 2: A blank Tab Control added to the
Form Design Grid.
The process of customizing the Tab Control simply involved adding an extra tab page and giving each tab its own individual name - ie Personal, Address and Education.
- I began by selecting the Tab Control by clicking its outer edge so that it was highlighted.
- Then I clicked the INSERT PAGE icon
 (located in the CONTROLS group of the DESIGN ribbon). This added a new blank page to the tab control, thereby giving us the three required tabs.
 - Next I clicked the part of the Tab Control which says PAGE1 to select this particular tab page.
- I then changed the CAPTION property for PAGE1 to "'Personal". This property is located on the FORMAT TAB of the PROPERTY SHEET.
- I repeated the process for the other two tab pages - so I had a tabs for "Personal", "Address" and "Education" respectively.
Adding Text boxes to the Tab Control
The final stage involved adding the text boxes to the tab control. The key thing to remember here is that it is important to select the required tab page before adding the text box to the tab control. It is also worth mentioning that if you are moving an existing form control to the tab control, you will need to cut and paste rather than simply drag and drop (otherwise it will sit on top of the tab control and not be a part of it).
- I began by clicking the ADD EXISTING FIELDS icon (located in the TOOLS group of the DESIGN RIBBON). This opened the FIELD LIST pane.
- I then selected the Personal Tab of the tab control (like I did in stage three of the customization process above).
- I then dragged the first four fields - EmployeeId, Firstname, Surname and DOB - from the pane over to the tab control and positioned them in the required location. When you try this yourself, notice how the tab control goes black as you position the text box. This shows that it is being added to the Tab Control rather than the form Detail.
- I repeated stages 2 and 3, adding the Address and Education related fields to the Address and Education tabs respectively.
- All I had to do then was align and resize the text boxes for a professional finish. A good way of doing this is to click on the text box and manually enter the grid position on the FORMAT tab of the PROPERTY SHEET - the TOP property determines the vertical grid position, the LEFT property the horizontal, and the WIDTH is self explanatory. You can also position the text box label's separately using the same method.
 |
| Figure 3: Adding fields to the Personal Tab Page. |


No comments:
Post a Comment