This post is all about getting started with the Access VBA programming language - a first tutorial starting right at the beginning. As you may already know, the Access Database comes with its own programming language called Visual Basic for Applications, or VBA. It offers a powerful way to automate and generally control how an access database application operates. However, whilst relatively easy to use, getting started can seem a little daunting to the newcomer. As such, this tutorial is intended to help the beginner feel at home in the programming environment.
| Figure 1: The Visual Basic Icon |
The first problem faced by the beginner is finding out how to get into this thing called VBA. This is because, technically, VBA is a separate software package which works alongside Access. That said, we can only open the VBA Editor (see figure 2 below) from within the Access database itself. The most direct way of doing this is by clicking the VISUAL BASIC icon (located in the MACRO's group of the DATABASE TOOLS ribbon - see figure one above). You might like to download the Learning Visual Basic Sample Database, and give this a try.
Learning Visual Basic Sample Database
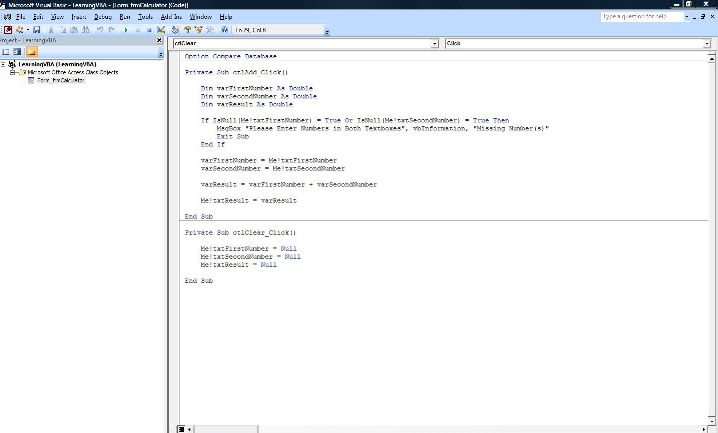 |
| Figure 2: The VBA Editor |
The sample database consists of an unbound form which acts as a simple calculator. There are three Text Boxes and two Command Buttons. The user enters two numbers in the top two text boxes and clicks the equals (=) buton. This runs a block of VBA code (called a sub procedure) which reads the numbers from the two text boxes, adds them together, and displays the result in the third text box. The user can then click the Clear button (C). This runs a different block of code to clear all the existing numbers from the text boxes so new numbers can be entered and calculated.
 |
| Figure 4: The Simple Calculator form described in the paragraph above. |
So lets take a look at how this is created. We shall do so in two stages: first we shall create the form, then open the VBA Editor and enter the two blocks of code.
Creating the Form
- Click the FORM DESIGN icon (located in the FORMS group of the CREATE ribbon).
- Drag and drop three text boxes on the the form (if you need help, you might like to check out my tutorial on how to Create an Access Form from Scratch).
- Next drag and drop the two Command Buttons onto the design grid. Make sure the USE COMMAND WIZARDS icon is not highlighted when you do this - otherwise just click the CANCEL button if the Command Button Wizard opens.
- Click on the label for the top text box and change the text to read "First Number".
- Repeat step 4 for the second and third labels, entering "Second Number" and "Result" respectively.
- Then click on the top text button and change the text to "C". This will be the Clear Button.
- Do the same for the lower text button, changing the text to "=". This will be the Equals Button.
- Next click the PROPERTY SHEET icon (located in the TOOLS group of the DESIGN ribbon).
- Set the NAME property (located at the top of the OTHER TAB of the PROPERTY SHEET) for the first text box to txtFirstNumber.
- Repeat step 9, calling the lower two text boxes txtSecondNumber and txtResult, and calling the Command Buttons ctlClear and ctlAdd.
Entering the VBA Code
When this is complete, you may save your code by clicking the SAVE icon, and close the VBA Editor. To test the code simply open the form in FORM VIEW, enter the numbers to calculate, and click the ctlAdd button. The correct result should display in the third text box once this is done.- Next click on the ctlAdd (=) Command Button whilst our form is still open in DESIGN VIEW.
- Open the PROPERTIES SHEET (if it is not already open) and click the EVENTS tab ctlAdd.
- Click the cell for the ON CLICK property. Then click the three dots button (...) at the right of the cell. This opens the CHOOSE BUILDER dialog box.
- Select CODE BUILDER from the menu items, and click OK. This opens the VBA Editor in the exact location where we are going to enter the code which is triggered when the user clicks the button at runtime (the ON CLICK Event). It even writes the first and last line of code which makes this a self contained block of code (a Sub Procedure).
- Enter the code (listed below) between the Private Sub and End Sub lines:
Private Sub ctlAdd_Click()
Dim varFirstNumber As Double
Dim varSecondNumber As Double
Dim varResult As Double
If IsNull(Me!txtFirstNumber) = True Or IsNull(Me!txtSecondNumber) = True Then
MsgBox "Please Enter Numbers in Both Textboxes", vbInformation, "Missing Number(s)"
Exit Sub
End If
varFirstNumber = Me!txtFirstNumber
varSecondNumber = Me!txtSecondNumber
varResult = varFirstNumber + varSecondNumber
Me!txtResult = varResult
End Sub
Now repeat all of the last stage from 1 to 5, but this time for the ctlClear Command Button. Enter the following code in the same manner as above:
Private Sub ctlClear_Click()
Me!txtFirstNumber = Null
Me!txtSecondNumber = Null
Me!txtResult = Null
End Sub
How the Code Works
Please don't worry about being able to create this code yourself at this stage in the learning process. The main purpose of this tutorial was to get you familiar with the programming environment, rather than how to construct the code. I intend to do this in future tutorials. However, we will go through each line of the first sub procedure just to give you a general idea of how the programming code works.
The code is triggered by the Command Button's ON CLICK event. The user clicks the command button, Access 'raises' the ON CLICK event, and the block of code runs one line at a time.
Private Sub ctlAdd_Click()
The first line, the SUB Statement, was created automatically by Access when we opened the VBA Editor from the property sheet. It's purpose is to mark the beginning of this block of code or Sub Procedure. The PRIVATE part of the statement relates to the concept of Scope. We won't worry too much about what this means at this stage, except to say it is concerned with where the sub can be 'called' from. Private means just that - it is private to this particular form module, and can not be called from a module elsewhere in the application. The part which says ctlAdd_Click is the name of the sub procedure.
Dim varFirstNumber As Double
Dim varSecondNumber As Double
Dim varResult As Double
The next three lines of code declare three separate variables. The purpose of variables are to enable values to be temporarily stored, processed, and retrieved. More about this soon. At this stage we are just going to note that we have used the DIM Statement to define three variables called varFirstNumber, varSecondNumber and varResult. We have also included AS DOUBLE to tell Access that the variables are going to store values of the DOUBLE data type (so we can calculate decimal numbers).
The next three lines of code declare three separate variables. The purpose of variables are to enable values to be temporarily stored, processed, and retrieved. More about this soon. At this stage we are just going to note that we have used the DIM Statement to define three variables called varFirstNumber, varSecondNumber and varResult. We have also included AS DOUBLE to tell Access that the variables are going to store values of the DOUBLE data type (so we can calculate decimal numbers).
If IsNull(Me!txtFirstNumber) = True Or IsNull(Me!txtSecondNumber) = True Then
MsgBox "Please Enter Numbers in Both Textboxes", vbInformation, "Missing Number(s)"
Exit Sub
End If
This next section of code is an IF Statement, and forms a self contained block of code within the sub procedure itself. It was something I added to ensure the user enters a number in each of the two text boxes. If it detects that there is a Null value it runs the nested code to display a message box, and then exits the sub.
In this section of code, we are assigning each of the two variables with a value. The equals sign assigns the variable name on the left of the sign with the value on the right. In this case the top line is setting the value of the varFirstNumber variable to the value entered by the user in the txtFirstNumber text box control. Note that the text box is referenced by means of the code: Me!txtFirstNumber. The Me! part of this is telling access that the text box belongs to the form to which this VBA module is attached ie frmCalculator; and txtFirstNumber is the name we gave to the top text box on the form we created earlier.
varResult = varFirstNumber + varSecondNumber
This line is assigning the variable varResult with a value. In this case the value being assigned is the sum of the values stored in varFirstNumber and varSecondNumber. Put another way, this line is performing the addition calculation and storing the result in the variable varResult.
Me!txtResult = varResult
This line is using the value stored in the varResult variable to set the value to be displayed in the lower text box of the form, txtResult. It references the text box in the manner already described above. This time, however, the text box reference is on the right hand side of the equals sign, and the variable on the left. This is because the value of the variable is being retrieved, and the value of the text box is being set.
End Sub
This line was generated automatically just like the first in this block of code. However, this time it is marking the end of the sub procedure.
Try this Yourself
If you are feeling adventurous, you might like to try creating more Command Buttons for the Calculator form. Try creating a button to multiply or subtract the values stored in the top two text boxes. You can follow the same procedure as before. However, when you copy and paste the code, change the addition operator (+) in the appropriate line for multiply (*) and subtract (-) respectively.
This next section of code is an IF Statement, and forms a self contained block of code within the sub procedure itself. It was something I added to ensure the user enters a number in each of the two text boxes. If it detects that there is a Null value it runs the nested code to display a message box, and then exits the sub.
varFirstNumber = Me!txtFirstNumber
varSecondNumber = Me!txtSecondNumber
In this section of code, we are assigning each of the two variables with a value. The equals sign assigns the variable name on the left of the sign with the value on the right. In this case the top line is setting the value of the varFirstNumber variable to the value entered by the user in the txtFirstNumber text box control. Note that the text box is referenced by means of the code: Me!txtFirstNumber. The Me! part of this is telling access that the text box belongs to the form to which this VBA module is attached ie frmCalculator; and txtFirstNumber is the name we gave to the top text box on the form we created earlier.
varResult = varFirstNumber + varSecondNumber
This line is assigning the variable varResult with a value. In this case the value being assigned is the sum of the values stored in varFirstNumber and varSecondNumber. Put another way, this line is performing the addition calculation and storing the result in the variable varResult.
Me!txtResult = varResult
This line is using the value stored in the varResult variable to set the value to be displayed in the lower text box of the form, txtResult. It references the text box in the manner already described above. This time, however, the text box reference is on the right hand side of the equals sign, and the variable on the left. This is because the value of the variable is being retrieved, and the value of the text box is being set.
End Sub
This line was generated automatically just like the first in this block of code. However, this time it is marking the end of the sub procedure.
Try this Yourself
If you are feeling adventurous, you might like to try creating more Command Buttons for the Calculator form. Try creating a button to multiply or subtract the values stored in the top two text boxes. You can follow the same procedure as before. However, when you copy and paste the code, change the addition operator (+) in the appropriate line for multiply (*) and subtract (-) respectively.


No comments:
Post a Comment