Suppose you have an Access Database containing the names and addresses of your customers. Every now and again you may want or need to send a standard letter to each customer who has opted in to such mailings. However, you are aware that these letters are going to look so much better, and work so much more effectively, if they are personalised to each particular recipient. A basic example of this is to print the name and address of the customer at the top of the letter, and to include the customers title and surname in the greeting line. We can go much further than this, of course, and include information about the customers account and even their previous orders (if appropriate).
There are two ways of doing this. We could create an access report which is fine and good. After all, the data is stored in Access, so why not create a the letter by means of such a report? It is certainly possible to do so. However, there may well be an advantage in merging your customer data stored in an Access table or query into an MS Word word-processing document. It is arguably much easier to sit down and compose a well presented standard letter using MS Word (than it is to create the same document in an Access report). It might be said that Word is a better tool for this particular job.
Mail Merge
The process whereby data from a table is integrated into a word processing document is known as a mail merge. The following exercise explains how to use information from the Access table in Figure 1 below.
 |
| Figure 1: The schema of the Access table we shall be using. |
Connecting to Access Data
This first stage in the process involves connecting MS Word to the database where the customer data is stored. We are going to be working on blank document here, but normally you would begin by composing your standard letter. The object of this exercise is to show how a Word document gains access to data in an MS Access table or query (rather than how to compose a well presented Word document per se).
- Open MS Word.
- Click the SELECT RECIPIENTS icon. This is located in the START MAIL MERGE group of the MAILINGS ribbon. Clicking the icon reveals a drop down menu.
- Select USE EXISTING LIST from the drop down menu.
- Browse to the location of your Access Database (in the window that has opened) and double click the it's file name. This opens the SELECT TABLE dialog form in which you see all the tables and queries from your database.

Figure 2: The SELECT TABLE dialog form. - Double click the name of the table or query containing the customer names and addresses. We are interested in the tblCustomer. The dialog form then closes. You are now ready to select which fields to use in your document.
Accessing Table or Query Fields
We have now connected to the Access Database and the table in which the customer data is stored. The next stage in the process is to insert fields from that table into the actual Word Document itself. We are going to use fields to enter the customer's address at the top of the letter, and to produce a greeting line. If we wanted, we could also go further and insert data from the table with the main text of the letter.
- Click the location on the document where the field is to be inserted.
- Click the lower half of the INSERT MERGE FIELD split button icon. This is located in the WRITE AND INSERT FIELDS group of the MAILINGS ribbon. A drop down list of fields appears (see figure 3 below).
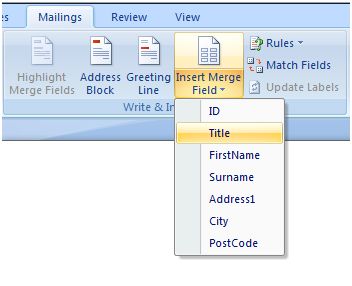
Figure 3: Insert Mail Merge Fields. - Select the customers title field from the list. A title field place holder now appears on the document.
- Repeat step 2, this time selecting the surname field. Make sure you leave a space between the two place holders.
- Go to a new line and then repeat step 2 again, this time selecting the first address field. Repeat this step for each of the address fields, each field on a separate line.
- Go down two lines below the address fields to enter the greeting line. Type a greeting such as "Dear ", leave a space, and then insert a title field, followed by another space, and then the surname field
Your document should now look like this:
 |
| Figure 4: The Mail Merge Field Placeholders. |
Merging Access Data
Once you have added the mail merge fields to your document, you are nearly ready to run the mail merge. Before we do, however, it is a good idea to preview what the documents are going to look like after the data is merged. Do this by clicking the PREVIEW RESULTS icon on the MAILING RIBBON. Each record from the database is then merged onto a separate document. You can scroll through each of these "document records" using the navigation buttons in the PREVIEW RESULTS group. This is how our document looks when previewed:
 |
| Figure 5 (above): Preview for the first record of merged data. |
 |
| Figure 6: FINISH AND MERGE. |
We can now run the mail merge. Do this by clicking the FINISH AND MERGE button (see figure 6 above). You are then given the option to PRINT DOCUMENTS or EDIT INDIVIDUAL DOCUMENTS. Doing the latter opens a new instance of Word containing the merged documents. You are then free to make any adjustments that you see fit, and print out when ready.


No comments:
Post a Comment