Friday, 30 March 2012

Calculating a Future Date with the DateAdd Function

If you read my blog last week you may have seen the sample Lending Library Database that I created to demonstrate a working example of the DAO Recordset.  You may have noticed that I used a function called DateAdd to calculate the future date that a library book is due for return.  As you may remember, this date was automatically entered as the value for the DueDate field in the tblLoan junction table via VBA code.

I thought it would be interesting to take a closer look at how the DateAdd function works. However, please  do bear in mind that the DateAdd funciton can also be used in Queries and Calculated Form Controls (not just in VBA code).  This is how the syntax for DateAdd is constructed:

DateAdd("interval", number, date)

Figure 1 (above): This shows the DateAdd function used
as a Calculated Field in a Query.  You can see an example of a Calculated Field
in my post on the related DateDiff Function. (NB DateDiff calculates and returns the difference between 
two dates, whereas DateAdd calculates and returns a new date based on the value of the number parameter passed).
Figure 2: This shows the DateAdd function used as a Calculated Control in a form.  It can be entered
into the CONTROL SOURCE property or directly into the text box on the  Form Design Grid.
DateAdd Parameters
As you can see, the DateAdd function has three parameters - interval, number and date.  

Interval
The interval parameter determines whether we are adding intervals of days, weeks, or months etc.  The parameter is entered as a string value; days are entered as "d", weeks as "ww" and months as "m".  There are 10 possible parameter values to choose from, ranging from years "yyyy" right down to hours "h", minuets "n", and seconds "s".  

Number
The number parameter is the number of intervals to be added.  So if we want to calculate a date 30 days in the future, we would set the interval to "d" and the number to 30.

Date
The date parameter is the base date we are applying the DateAdd function to.  As such, if we want to calculate a date 30 days from 1/4/2012, we would simply enter 1/4/2012 as the date parameter value. If you want to calculate a date from today (whatever date that may be on the day you are reading this) you can enter the Date() function as the actual parameter value.  This will return the current date when the database is being run.

Calculating a Library Book Due Date

This is the syntax I used in the last weeks lending library database to calculate a DueDate 30 days from when a book is issued:

DateAdd ("d", 30, Date())


Figure 3: This shows the DateAdd function used in the fourth line of this VBA code snippet.
The rstLoan object is a DAO Recordset, and DueDate is the field name in the tblLoans Table.
You can see the rest of the code in last weeks blog post on the DAO Recordset.
As you can see, the interval used is days, the number parameter is 30, and I have used the Date() function to return the current date for the date parameter.

Friday, 23 March 2012

The DAO Recordset in Action - An Example Lending Library Database

Last week I wrote a post on How to Access Data with VBA Code.  Instrumental in this was the use of the DAO Recordset Object.  Through using this object we were able to add, find, edit and delete records from an Access Database table or query. This week I am going to provide a working example of how the DAO Recordset is used in an actual database application.  In order to do this, I have created part of a Lending Library Database for demonstration purposes. This can downloaded by clicking the link.

The Lending Library Database
The table at the centre of this database is the Loans table (jnkLoan).    As you can see from figure 1, it is a junction table (from a Many to Many Relationship) which contains the foreign key from both the Library Users table (tblLibraryUser) and the Library Stock Table (tblLibraryStock).  The purpose of tblLoans is to store the details of each loan transaction whereby a library user borrows or returns an item of library stock.  

Figure 1: The table relationships from the Lending Library Database
Figure 2 below shows the Library User Account Form where these loan transactions are made.  Transactions are occur when the user enters a number into the ITEM BARCODE text box, and clicks the ISSUE or DISCHARGE command button.  This then runs a VBA sub procedure which uses the DAO Recordset to create a loan record in tblLoan.

Figure 2: The User Account form. Library items are issued and discharged from here.

The User Account Form also has an On Loan subform to list items out on loan to the library user.  The RECORD SOURCE for this subform is qryLoansSub, and contains fields from the jnkLoan, tblLibraryStock, and tblBook tables.  There is a criteria value of Is Null on the ReturnDate field.  As such, any loan transaction without a ReturnDate (belonging to the UserBarcode from the parent form) is listed as being On Loan.  Moreoever, the VBA code initiated by the ISSUE and DISCHARGE buttons ends with a line to requery the subform.  This ensures the subform updates as soon as a stock item is issued or discharged.

Issuing an Item
So lets have a look at the VBA code which runs when the ISSUE button is clicked:

Private Sub cmdIssue_Click()
On Error GoTo trapError
    Dim rstLoan As DAO.Recordset
    If IsNull(DLookup("StockBarcode", "tblLibraryStock", "StockBarcode = " & Me!txtIssueBarcode)) = True Then
        MsgBox "Sorry - Barcode Does Not Exist", vbInformation, "Invalid Barcode"
        GoTo leave
    Else
        Set rstLoan = CurrentDb.OpenRecordset("jnkLoan", dbOpenDynaset)
        rstLoan.FindLast "StockBarcodeFK = " & Me!txtIssueBarcode
        If rstLoan.NoMatch = False Then
            If IsNull(rstLoan!returndate) = True Then
                MsgBox "Book Is Already On Loan.  Please discharge before Issuing.", vbExclamation, "Already On Loan"
                GoTo leave
            End If
        End If
        rstLoan.AddNew
            rstLoan!StockBarcodeFK = Me!txtIssueBarcode
            rstLoan!UserBarcodeFK = Me!UserBarcode
            rstLoan!IssueDate = Date
            rstLoan!DueDate = DateAdd("d", 30, Date)
        rstLoan.Update
        Me!subOnLoan.Requery
        Me!txtIssueBarcode = Null
        DoCmd.GoToControl "txtissuebarcode"
    End If
leave:
    If Not rstLoan Is Nothing Then
        rstLoan.Close: Set rstLoan = Nothing
    End If
    Exit Sub
trapError:
    MsgBox "Error " & Err.Number & ": " & Error$
    Resume leave
End Sub


The code begins by checking that the item barcode actually exists, and is not, therefore, a data entry error. This is done using the DLookUp function on the StockBarcode field of tblLibaryStock.  If it does not exist, a warning message is displayed, and the sub procedure comes to an end.  If it does exist, the code continues to open a DAO Recordset object based on jnkLoan.  This is then searched using the FINDLAST method of the recordset object to find the most recent transaction involving that particular item.  If a record is found, the ReturnDate value is checked to make sure the item is not recorded as already being on loan (it is an not an uncommon human error for some items to be shelved without first being discharged).  If the item is recorded as being On Loan  an error message is displayed asking the staff member to discharge the book before re-issuing.  The procedure then comes to an end.  If there had not been a previous transaction for that item, or if the previous transaction has a ReturnDate value, the code continues to create a new record in jnkLoan.  

The following block of code (a section extracted from the main code above) is where the new record is created:

 rstLoan.AddNew
            rstLoan!StockBarcodeFK = Me!txtIssueBarcode
            rstLoan!UserBarcodeFK = Me!UserBarcode
            rstLoan!IssueDate = Date
            rstLoan!DueDate = DateAdd("d", 30, Date)
  rstLoan.Update

Here the AddNew method of the Recordset Object is called to create the new record.  Then the StockBarcodeFK field is set to the value of the Item Barcode textbox; the UserBarcodeFK field is set to the value of the UserBarcode on the User Account Form; the IssueDate field is set to the current date via the Date function; and the DueDate field is set to 30 days from the current date via the DateAdd function.  The changes made to the rstLoan Recordset are then saved back to tblLoan via the recordset object's Update method. Finally the code re-queries the OnLoan subform, puts the focus back on the Item Barcode textbox, and closes the recordset.

Discharging an Item
The sub procedure which runs when a book is discharged is very similar.  The main difference is that rather than creating a new loan transaction record, the last loan transaction record is found, and then edited by putting the current date in the ReturnDate field.   Here is the discharge code:

Private Sub cmdDischarge_Click()
On Error GoTo trapError
    Dim rstLoan As DAO.Recordset
    If IsNull(DLookup("StockBarcode", "tblLibraryStock", "StockBarcode = " & Me!txtIssueBarcode)) = True Then
        MsgBox "Sorry - Barcode Does Not Exist", vbInformation, "Invalid Barcode"
        GoTo leave
    Else
        Set rstLoan = CurrentDb.OpenRecordset("jnkLoan", dbOpenDynaset)
        rstLoan.FindLast "StockBarcodeFK = " & Me!txtIssueBarcode
        If rstLoan.NoMatch = False Then
            If IsNull(rstLoan!returndate) = False Then
                MsgBox "Book Not On Loan.", vbExclamation, "Already On Loan"
                GoTo leave
            End If
        End If
        rstLoan.Edit
            rstLoan!returndate = Date
        rstLoan.Update
        Me!subOnLoan.Requery
        Me!txtIssueBarcode = Null
        DoCmd.GoToControl "txtissuebarcode"
    End If
leave:
    If Not rstLoan Is Nothing Then
        rstLoan.Close: Set rstLoan = Nothing
    End If
    Exit Sub
trapError:
    MsgBox "Error " & Err.Number & ": " & Error$
    Resume leave
End Sub

If you would like to try all this out, please feel free to download the sample Lending Library Database. You can view a list of library item barcodes to work with by clicking the LIBRARY STOCK command button at the top of the User Account Form.

Friday, 16 March 2012

Accessing Data with VBA Code - Introducing the DAO Recordset

This post is all about how we can use VBA code to access the data stored in our database.  By access, I mean, being able to add, find, edit or delete records.  In so doing we are effectively automating data access thereby enabling us to create some very powerful database applications.

Creating a Reference
To do this we are going to make use of Data Access Objects (DAO) which is contained in the Microsoft Office 12 Access database engine Object Library.  The very first thing we must do is create a reference to this library if it does not already exist.  The procedure for doing this is really quite simple:
  1. Open the VBA Editor.
  2. Open the TOOLS menu.
  3. Select REFERENCES from the TOOLS menu.
  4. When the REFERENCES dialog form opens, check to see whether Microsoft Office 12 Access database engine Object Library has a tick against it.  If it has it should be towards the top of the list (all checked references appear above the others, and those that are not, appear in alphabetical order below).
  5. If the library mentioned in stage 4 is not ticked, you will need to scroll down the list to find it, and then tick the check box.
  6. Click OK to close the dialog form.
The reference has been created and you are now ready to start using Data Access Objects.


Introducing the DAO Recordset
The DAO Recordset is basically a VBA object which enables us to gain access to information stored in database tables or queries via code.  It is VBA's representation of the table or query, and we make use of the methods and properties of the DAO Recordset to manipulate the data that it contains.

The first coding task we have to perform is to create an instance of the recordset object.  This is then stored as an object variable. We do this with the following line of code:

Dim rstNameList as DAO.Recordset

This creates an object variable called rstNameList.    Our the next task is to set the value of  this object variable. This effectively means that we are setting  rstNameList to represent a particular table or query in our database.  This is done as follows:

Set rstNameList = Application.CurrentDb.OpenRecordset("tblNames", dbOpenDynaset)

This line of code sets the value of object variable rstNameList to a DAO Recordset based on a table called tblNames.  This is done by using the OpenRecordset method of the Recordset Object.  This is applied against an object reference to the current database - hence our use of the CurrentDb method of the Application object preceding OpenRecordset.  Don't worry if this sounds confusing, just remember to enter the name of your table or query as the first parameter of the OpenRecordset method.  The second parameter, dbOpenDynaset simply opens the recordset as a Dynaset type (which is a particularly versatile type).  

We can now apply the methods and properties of the Recordset class against the object variable rstNameList. As we do so, remember that they are acting on a virtual representation of the database table or query being used.  Lets look at how we can add a record to our table via rstNameList:

Adding Records
Imagine our table is comprised of four fields: Id, FirstName, Surname, and DOB (ie date of birth).  This is the data our table currently holds:
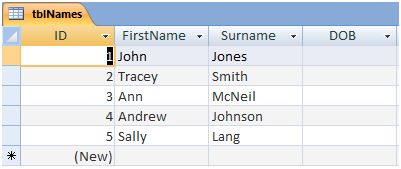
Figure 1: Table data from tblNames.
The rstNameList Recordset Object is based on this table.

The following code is designed to add a new record for a person called Graham Bell:

Private Sub cmdAdd_Click()    
    Dim rstNameList As DAO.Recordset
    Set rstNameList = Application.CurrentDb.OpenRecordset("tblNames", dbOpenDynaset)
    
    rstNameList.AddNew
        rstNameList!FirstName = "Graham"
        rstNameList!Surname = "Bell"
        rstNameList!DOB = #7/10/1970#
    rstNameList.Update
    
    If Not rstNameList Is Nothing Then
        rstNameList.Close: Set rstNameList = Nothing
    End If   
End Sub 

Lets go through this:

This code is triggered when a command button called cmdAdd is clicked by the user.  The code then declares an object variable called rstNameList which is subsequently set to a Recordset based on tblNames.  

The central block of code calls the AddNew method of the Recordset object.  This basically signals that a new record is going to be added to the recordset.  The next three lines reference the FirstName, Surname and DOB fields, setting their values respectively.  As such the FirstName field value is set to "Graham", Surname to "Bell", and DOB to 7/10/1970.  Note the FirstName and Surname fields are of the STRING data type, so are consequently enclosed within quotation marks ie ""; whereas the DOB field is of the DATE data type so is enclosed between hash marks using the American Date Format ie #mm/dd/yyyy#. (Had we used the number data type this would not have needed to be enclosed by anything). Finally the central block of code saves the new record by calling the Update method of the Recordset object.

The final block of code simply closes the recordset object and destroys the object variable reference so as not to use unnecessary memory.

You can now go back to the original table tblNames, and click Refresh to see the new record:
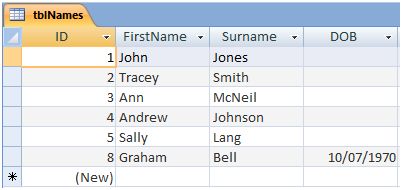
Figure 2: The tblNames table after new record is added via VBA Code.
As you can see, the new record has been added at the bottom of the table.  Note that we did not need to set the value of the ID field as this is of the AUTONUMBER data type and is added by Access automatically.

Editing Records
The code for updating a particular record is very similar to the central block of code in the in the previous example.  The main difference is, however, that we must find the record prior to making any changes.  To do this we are going to use the FindFirst method of the Recordset object.  The syntax for this is as follows:

 rstNameList.FindFirst "Id = 5"
Notice that this method passes the parameter "Id = 5".  This is basically an SQL WHERE clause without the WHERE keyword.  It tells access to find the first record in the recordset where the value of the ID field is 5.  There is more information on SQL Where in my Gentle Introduction to Access SQL. Just remember that the parameter must be enclosed within quotation marks, so if the value searched for is itself a string, you must not only enclose the parameter within quotation marks ie "", but you must also enclose the actual value to be found within single quotation marks ie ' '. For example if you wanted to search for the surname Lang, the syntax would be:

rstNameList.FindFirst "Surname = 'Lang' " 

It is also possible to test whether a record has actually been found using the NoMatch property of the Recordset object as follows:

If rstNameList.NoMatch = false Then
    .... code to run if record is found. 
Else
    ....code to run if no record is found.  
End if

Once we have found the record, we can then go on to edit any, or all, of its fields.  This is done with the following code:

rstNameList.Edit
        rstNameList!DOB = #8/10/1970#
rstNameList.Update

Notice how we have used the Edit method of the Recordset object instead of AddNew.  The rule is use Edit if you want to edit an existing record, and use AddNew if you want to create a new record.  Once the record has been edited it needs to be saved using the Update method as before.  So lets look at the whole code snippet:


Dim rstNameList As DAO.Recordset
Set rstNameList = Application.CurrentDb.OpenRecordset("tblNames", dbOpenDynaset)
    
    rstNameList.FindFirst "Id=5"
    If rstNameList.NoMatch = False Then
        rstNameList.Edit
            rstNameList!dob = #8/10/1970#
        rstNameList.Update
    End If
    
If Not rstNameList Is Nothing Then
    rstNameList.Close: Set rstNameList = Nothing
End If


If we refresh the data in tblNames, you can see that our code has put a DOB value in Sally Lang's record:
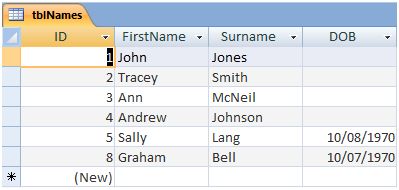
Figure 3: The record of Sally Lang (ID 5) now has a DOB value
after her record was edited with our code.
Deleting Records
When it comes to deleting a record, we start by finding the particular record that we want to delete.  Again this is achieved using the FindFirst method of the Recordset Object.  So suppose we wanted to delete Graham Bell's record, we could do a FindFirst search on his record ID which is 8.

rstNameList.FindFirst "Id = 8" 

All we do then is apply the Delete method of the Recordset Object as follows:

rstNameList.Delete 

Again, it is a good idea to nest the above line in an If ...Then... Else statement to test that a matching record has been found.  As such the full code to delete record 8 is as follows:

Dim rstNameList As DAO.Recordset
Set rstNameList = Application.CurrentDb.OpenRecordset("tblNames", dbOpenDynaset)
    
rstNameList.FindFirst "Id=8"
If rstNameList.NoMatch = False Then
    rstNameList.Delete
Else
    MsgBox "Record Not Found"
End If
    
If Not rstNameList Is Nothing Then
    rstNameList.Close: Set rstNameList = Nothing
End If


The record has now been removed from the table:
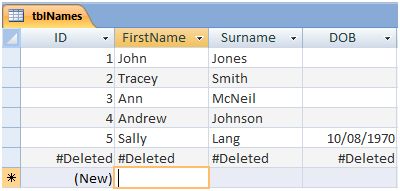
Figure 4: Our code has deleted the intended record.

These have all been basic examples to demonstrate how we can access and manipulate data using VBA code.  How we use the Recordset object in a real database application depends entirely on what needs doing. I have found the possible uses of the DAO Recordset to be virtually endless. It is an extremely   powerful tool to draw upon when needed.  As such, I hope to show some applied examples of its possible uses in a future post.

Friday, 2 March 2012

Calculating Questionnaire Percentages using a Multi-Level Query

Last Saturday I received an interesting question from Ogwang Denis on my Access Tutorial Facebook page. He had created an Access Database to store the results of a survey questionnaire comprised of a number of Yes/No questions, and wanted to know how he could process the answers in a query to produce a percentage.  

The solution to this problem is not quite as straight forward as it may at first seem. As Oswang correctly points out, the table field we want to process is of the Yes/No Data Type.  Moreover, each answer to this question is contained in separate interviewee records'.  The task can be articulated into three distinct stages:
  1. Count how many interviewees' have been asked this question regardless of answer given.
  2. Count how many interviewees' answered YES to this question.
  3. Calculate the percentage of Yes answers on the basis of information obtained in stages 1 and 2 above.
Each of these three stages is accomplished with a separate Query.  Moreover, the 3rd stage query uses the summary data provided by the two queries created in the first two stages. As such the final query is multi-levelled - the actual table data represents the first level; the stage 1 and 2 queries, the second; and the third stage query represents the third and final level.  We will see how this multi-levelling is achieved shortly.

Sample Exercise:
Let's look at a simplified database that I created in order to illustrate these stages.  The table, from which the queries are based, contain three questions in each record.  Each question is of the Yes/No Data Type.  

Figure 1: The sample data we shall be working with is
stored in a table called tblQuestionnaire.   Each record represents a separate
interviewee's set of answers.  In this exercise we are just interested in their answers' to Question1.
Stage 1:
The first stage involves creating a query to count the number of interviewee records - that is to say, the count of how many times Question1 was asked.  This just requires a single query column based on the count of  the ID field in tblQuestionnaire.  We shall save this query as qryQuestion1Count:

Figure 2: The stage one query saved as qryQuestion1Count.
Stage 2:
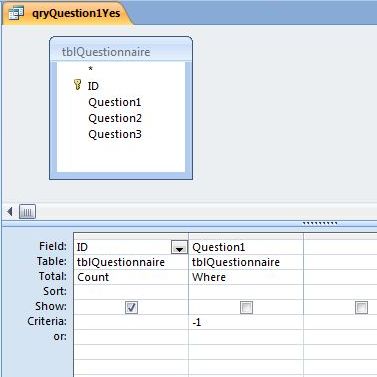
The second stage involves creating a query to count the number of YES answers to Question1. This is achieved by counting the ID field of tblQuestionnaire as we did in the first query, but this time we shall also add a second query column based on the Question1 field. This column needs to contain a criteria to filter out the YES answers (since -1 represents YES when dealing with the Yes/No Data Type, the criteria will be = -1).  As such we are creating a query to count the ID fields of all records WHERE Question1 = -1. We shall call this query qryQuestion1Yes:

Figure 3:  The stage two query saved as qryQuestion1Yes.  This counts the number of
ID fields (and hence records) in tblQuestionnaire WHERE Question1 = -1.
Stage 3:
For the third and final stage, we need to create a query based on the previous two queries.  We do this by selecting qryQuestion1Count (the stage one query), and qryQuestion1Yes (the stage two query), from the QUERIES tab of the  SHOW TABLE dialog form, when the Query Design Window opens.  

Figure 4: The Third Stage Query - qryQuestion1Percent.
As you can see from the screenshot in figure 4 above, both sub-queries (used in the main stage 3 query)  contain the same field name - CountOfId.  The difference between them is, as we have already seen, qryQuestion1Count counts the number of ID's of records where Question1 was asked (regardless of answer given), and qryQuestion1Yes counts the number of ID's of records where Question1 has been answered YES.  From this information we can create a Calculated Field to work out the percentage of Question1 YES answers.  In the screenshot above, I have divided 100 by the count of the number of times Question1 was asked, and multiplied this by the number of times Question1 was answered YES.  On account of the duplicate field names used in this calculation, I have had to refer to each field in turn with the query name, from which it has derived, preceding - ie [qryQuestion1Count].[CountOfId] and [qryQuestion1Yes].[CountOfId]. I have also given this Calculated Field the Alias of Percentage. (There is more information about Calculated Fields in the post I published last week).


The Result: 
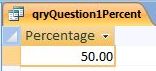
In our sample data the question was asked 20 times, and was answered YES 10 times. As such, if we work out the calculation manually, the figures are:  100/20 * 10. The answer is 50%, which is indeed the result of the stage three query when it is run.


Figure 5: Query result returned by qryQuestion1Percent on sample data. 


Friday, 24 February 2012

Using Calculated Fields in Queries

Queries play an important part (in relational database design) in pulling information from different tables together. Consider the Many to Many relationship at the centre of an Order Management System.  Here we have three tables - Orders, Order Details and Products.  When we come to create the record source for the order items section of the invoice report,  it is necessary to get data regarding an order items quantity from the Order Details table, and that of product cost per unit from the Products Table. Then it is the OrderId from the Orders Table which groups all Order Details records into a single order.

Figure 1 (above):  A simplified example of a Many to Many Relationship from an Order Management Database.


Figure 2: A sample Invoice Report taken from one of my Order Management Database designs.
The Order Items Section is located in the middle of the report.  CostPerUnit is
displayed here as Unit Cost and Amount as Total.  This  section contains
details of each individual order item which, taken together,
makes up the whole order.
As well as bringing information together in this way, query's play another important role in as much as they are commonly used to calculate and process information from these tables.  This may be done by means of a Calculated Field.  This is basically a new query column, the values of which being derived from some calculation or expression.  As such, we are effectively creating new data for our database.  So why is this important?  Well, consider the Order Management Database Invoice mentioned earlier.  As already stated, the Order Details table contains data pertaining to an order items quantity, and the Products table to an items Cost Per Unit.  There is nowhere in a well designed ('normalised') database where we store the total of quantity*cost per unit. It is considered good practice to calculate this information (so we avoid storing unnecessary data which uses extra memory, and makes the database less efficient and user friendly).  The Calculated Field used in a query is a common way of doing this.

Creating a calculated field is really quite easy.  Rather selecting a table field on the top row of the query design grid, we manually type the name (or alias), followed by a colon, then followed by the calculation or expression.  So if we wanted to create a calculated field to process quantity * cost per unit, we would use this syntax:

Amount: [Quantity]*[CostPerUnit]

I should point out that the alias used here - ie Amount - is entirely arbitrary text chosen by the database developer. It is, however, good practice to make it something meaningful in order to make it easier for the developer to understand at a later point in time.

Let look at how this fits in with the rest of the query:

Figure 3: Query with Calculated Field on the right.

As you can see the query contains a mixture of fields from all three tables involved in the many to many relationship.  The Calculated Field has been added to the column on the right.  You may have noticed that the calculated field looks slightly more complicated than the syntax I wrote earlier in the post.  This is because we are also specifying the table name as well as the field name.  As such:

[tblOrderDetails].[Quantity] 

... refers to the Quantity field of tblOrderDetails, and:

 [tblProducts].[CostPerUnit] 

... refers to the CostPerUnit field of tblProducts.

It is essential to write the full reference in this way if any tables or sub-queries involved in the query contain duplicated field names.  Although this is not the case in this example, it does no harm to get into the habit of writing the full syntax anyway.

And this is the output from the query showing the result of the calculated field on the right:

Figure 4: The Query Output.
Since this query has an ID field corresponding to tblOrder.OrderId, it can now be used as the record source for the Order Items section of an Invoice Report or Orders Subform.  To do this the LINK MASTER FIELDS property of the subform is set to ID and the LINK CHILD FIELDS is set to OrderId.  There is then the matter of creating the record source for the main section of the invoice report or orders form (this also involves creating Calculated Fields to get the Order Totals).  Unfortunately this goes beyond the scope of this particular post.

Friday, 17 February 2012

More on DoCmd OpenForm: Control Form Opening Part Two

Last week I blogged about how to Control Form Opening using the DoCmd OpenForm method of VBA.  I covered the DataMode and OpenArgs parameters in some detail.  Since being able to control form opening is an important part of database customization, I shall continue by looking at two other parameters of this method - namely the VIEW and WHERE parameters.

If we recap briefly on what we learnt last week, you may remember that we used DoCmd OpenForm to control whether the form was opened ready to add a new record, or edit an existing record. A label caption was also set according the value passed to the form in the statement's OpenArgs parameter. This time we are going to try something slightly different.  We are going to create a command button, which when pressed by the user, opens that same form in DATASHEET VIEW as well as displaying records matching a given criteria. The end result will be a datasheet list of all employees where the Position field contains the value of "Manager".

Let's remind ourselves of the syntax for DoCmd OpenForm:

DoCmd.OpenForm "FormName", View, "FilterName", "WhereCondition",  DataMode, WindowMode, "OpenArgs"

As you may remember, only the FormName parameter is required, all others being optional.  Just remember to include a comma if any of the parameters are not used (unless they comes after  the last used parameter, in which case they are not needed).  So let's look at the specific syntax we need in order to achieve the task of producing a list of Managers in Datasheet View:

DoCmd.OpenForm "frmEmployees",  acFormDS, , "position = 'manager'"

As you can see, the VIEW parameter has been set to acFormDS.  This value simply indicates that we want the form to open in Datasheet View. When you come to enter this yourself, you will see that intellisense opens a drop down list of valid parameter values:

Figure 1: Intellisense displaying a list of valid parameter values for VIEW.
The next used parameter is the WhereCondition.  This is basically an SQL WHERE clause, but without the  WHERE keyword (see my Introduction to Access SQL for more information about SQL WHERE).  You may also think of this as being like the criteria you enter in the Criteria Row of a Query Design Grid. When used as a OpenForm parameter,  just remember to enclose it within quotation marks, as it is a string value - ie:

"position = 'manager'"

Now that we have grasped the particular syntax for DoCmd OpenForm, we are going to add a command button to the Switchboard form we created last week, and add the following code to its OnClick Event:

Private Sub ctlManagers_Click()
    DoCmd.OpenForm "frmEmployees", acFormDS, , "position = 'manager'"
    DoCmd.Close acForm, Me.Name    
End Sub


NB the DoCmd.Close statement simply closes the switchboard so it does not get in the way once our employees form opens.


Our Switchboard should now look like this:

Figure 2: The new updated switchboard from last week.
The code above it is written behind the ctlManagers button's (top) OnClick Event.
Here is the result when the user clicks the ctlManagers button (captioned "List Managers"):

Figure 3: frmEmployees displayed in Datasheet View with WhereCondition applied.
As you can see, rather than our employees form being displayed in standard Form View, passing the acFormDS as the View parameter has instead opened frmEmployees as a Datasheet similar to a table or query; and out of a list of 22 employees, passing "position = 'manager'" as the  WhereCondition  parameter has provided a list of the two employees who have "Manager" as their Position.  

If you have not already created this database for yourself, you might like to download the completed solution and experiment by changing, amongst others, the WhereCondition, to see the versatility of DoCmd OpenForm for yourself.

Friday, 10 February 2012

Control Form Opening: DataMode, OpenArgs, and the DoCmd.OpenForm Method

Lets imagine we have an employees form to add and edit our employee records.  The form is accessed via the database switchboard which contains a couple of Command Buttons.  The user clicks the NEW EMPLOYEE button and the form opens in DATA ENTRY MODE; that is, as a blank form ready for a new record to be entered.  If, however, he or she clicks the EDIT EMPLOYEE button, the form opens in FORM EDIT MODE; at an actual employee record ready to be edited as required.  What's more, the form contains a label displaying a caption inviting the user to add a new employee, or edit an existing employee record depending on which button was pressed on the switchboard.
Figure1 (above): The Switchboard with Command Buttons
to open frmEmployees.

Figure 2: Form Design for frmEmployees. 
Note the label containing the text "Instructions": this text is
dynamically reset as the form opens.

Since we have learnt some basic VBA programming skills at the end of last year, lets look at how we can do this using the DoCmd.OpenForm method.   As we shall soon see, this method passes a number of parameters to the opening form, determining various aspects of how we want it to function.  DataMode and OpenArgs are the two parameters we shall be using to accomplish the task set out in the above mentioned scenario.

DoCmd.OpenForm"formName",View,"FilterName","WhereCondition",DataMode, WindowMode,"OpenArgs"


Figure 3: The IntelliSense feature of the VBA Editor will
help when you come to enter the DoCmd.OpenForm parameters.
Here is an outline of the tasks involved:

  1. Create the Switchboard Form with two Command buttons - ctlNew and ctlEdit.
  2. Add code to each of the command buttons which opens frmEmployees in the desired DataMode and with the corresponding label caption for adding or editing.
  3. Create frmEmployees along with its underlying data source (ie an employees table).  The form should have a label control (lblInstuctions), and text boxes/combo boxes for each of the fields.  NB for the purposes of this exercise it does not particularly matter what the fields are.
  4. Add the relevant code to the OnOpen Event of frmEmployees.  This is going to read the value of the forms OpenArgs Property, which is set when the user clicks one of the two command buttons on the switchboard.  Then, depending on what that value is, display the appropriate caption for lblInstructions.

Let's go through stage two and stage four in more detail.  

To begin with lets look at the code used behind each of the two command buttons on frmSwitchboard. These statements are executed behind each command button's OnClick Event

Stage Two Code:

Private Sub ctlEdit_Click()
    DoCmd.OpenForm "frmEmployees", , , , acFormEdit, , "Edit"   
End Sub

Private Sub ctlNew_Click()    
    DoCmd.OpenForm "frmEmployees", , , , acFormAdd, , "Add"  
End Sub

As you can see, the DoCmd.OpenForm method has a total of seven parameters, but only the first of these is required (as opposed to optional).  Not suprisingly the required parameter is the name of the form to be opened, which in our case is "frmEmployees".  In addition to the form name we also set the DataMode and OpenArgs parameters.  For our scenario, DataMode determines whether the form is going to be opened in DataEntry (acFormAdd) or Edit (acFormEdit) mode.  It is the fifth parameter in the list. The  OpenArgs parameter, on the other hand, is seventh in the list.  This is simply a string value which will set the opening form's OpenArgs property.  Once the form has opened, we are going to read the value of this property to determine which message we are going to display in the label caption shown in figure two above. As such we are going to pass a string value which indicates whether we are adding or editing the employee record.  Please note that the text of the string value is entirely arbitrary.  We just need to choose a unique value in order to differentiate between adding and editing as the form opens.  

Here is the code we need to enter behind the frmEmployees OnOpen Event:

Stage Four Code:

Private Sub Form_Open(Cancel As Integer)
    If Me.OpenArgs = "Edit" Then
        lblInstructions.Caption = "Please Edit Employee Record"
    ElseIf Me.OpenArgs = "Add" Then
        lblInstructions.Caption = "Please Add New Employee Record"
    End If
End Sub

As you can see this code reads the value stored  in the opening form's OpenArgs property and uses a If ... Then ... Else Statement to determine whether our instructions label should display information pertaining to Editing or Adding an Employee Record.  

Figure 4: frmEmployees for Editing.

Figure 5:  frmEmployees for Adding (DataEntry).
As you can see, the screenshot in Figure 4 shows what our form looks like when it opens for Editing, and that in Figure 5 shows what it looks like for Adding. So despite being exactly the same form, we have dynamically controlled how it looks and functions by setting the DataMode and OpenArgs parameters of the DoCmd.OpenForm method.

Friday, 3 February 2012

Creating a Form for a Many to Many Relationship

I was recently asked how to create a form to input order management data where there is an underlying Many to Many Relationship in place.  There are, of course, many ways of dealing with this common scenario, but the particular solution I suggested involved creating an Order Form, with an Order Details subform.  When the user enters the Order Details data on the subform, he or she is able to select a Product Item from a Combo Box list. The Row Source used for the Combo Box list is data drawn from the Products table.  Hence we have all sides of the Many to Many Relationship represented on a single form.
Figure 1 (Above): The Many to Many Form; the solution I suggested
in answer to dcodding's question.
 Figure 2: The underlying Many to Many
Relationship Structure, upon which the form is based.
It is interesting to note where each of the fields from the Order Form is located in the underlying Many to Many Relationship structure.  So let me briefly take you through this.

The main section of the order form has three fields derived from tblOrder, the left hand table in figure 2 above.  These are the OrderId and OrderDate fields.  In addition to this we also have the CustomerId field which is the foreign key from tblCustomer (a table which is not part of the Many to Many Relationship, therefore not shown in Figure 2).

The relationship between the main section of the Order Form and it's subform is modelled on the One to Many Relationship between tblOrder and tblOrderDetails. However, because we have an underlying Many to Many Relationship, I have created a query for the Subforms' Record Source which has fields from both tblOrderDetails and tblProducts.  Moreover, the second ProductId field is actually a combo box which uses data from tblProducts as its Row Source.

Lets take a closer look at the subform's design and underlying query:

Figure 3 (Above): The Order Details Subform design grid.

Figure 4: The Query used for the Subform's Record Source.
As you can see, ProductId, ProductId, and Quantity are derived from tblOrderDetails, and CostPerUnit is derived from tblProducts.  ProductId is, of course the foreign key from tblProducts. There is also a Calculated Field (Total) which multiplies the CostPerUnit by Quantity to provide the actual purchase price.

So why then do we have two ProductId's?  The reason for this is that the second ProductId does not actually display the Id number per se. Since this field is represented by a Combo Box control on the subform, the data which is displayed can be different to that which it is bound to.  So in order to make the subform more user friendly, the control is set up to display the product's ItemName from tblProducts whilst being bound to the tblOrderDetails.ProductId field. This is done by setting the combo box Control Source property to ProductId,  and its Row Source property to tblProducts. As such, using the Combo Box in this way has enabled the subform to obtain information from the products table on the right hand side of the Many to Many Relationship. For detailed information on how to do work with Combo Boxes in this way, you might like to see my post on Customizing an Access Combo Box.

So what happens when the user comes to enter data in the subform? If  the user knows the productId number for the Order Item in question, he or she will enter that number in the first column of the subform.  Since this is the foreign key for the Products table, doing so will 'bring' any other subform field derived from tblProducts along with it.  In other words once the user enters a productId, data in the CostPerUnit field for that product record is displayed in the appropriate field of the subform.  In addition to this, the ItemName for the product is displayed in the Combo Box control, since its Row Source is bound to ItemName in tblProducts.  If, on the other hand, the user does not know the ProductId, he/she may leave the first field blank, and select a value from the Combo Box drop down list.  Since the Combo Box Control Source is bound to ProductId of tblOrderDetails, and its Row Source, as we know, is bound to ItemName of tblProducts, this is effectively the same as entering the ProductId number directly.  What's more, data from tblProducts is 'brought' over to the subform as before.  Hence, the first productId field of the subform is filled in automatically.

We see, therefore, that this relatively simple and user friendly form not only represents all tables in this Many to Many Relationship, but also provides a practical example of how the Many to Many Relationship works in action.