The DoCmd.OpenForm command is a useful tool for the Access for Office 365 database developer wanting to control the manner in which a form opens during runtime. I have written about it previously in my post on how to "Control Form Opening". However, in today's post, we are going to focus on a specific area of this command's use - that is, how we can pass multiple values via its OpenArgs property.

The OpenArgs parameter of DoCmd.OpenForm gives us the means to pass a single string value to the OpenArgs property of new form being opened. After the form has opened, this value can then be read and used by any code able to reference the new forms OpenArgs property. As things stand, the limitation of this is that we can only pass one string value as the command executes. So let's see how we can get around this, and pass any number of strings values in one go.
To demonstrate how this works, I have created an Access for Office 365 form containing three text boxes and a submit button. When the user populates the text boxes and clicks SUBMIT during runtime, the values contained in each of the three text boxes are passed over to a new form by means of the OpenArgs parameter of the DoCmd.OpenForm command.
 |
| Above: Form to pass multiple values via the OpenArgs parameter of DoCmd.OpenForm. |
You can download the full OpenArgsPost.accdb database used in the this exercise from here.
(NB I have tested the download process using the Chrome browser which works OK. The download process may fail using other browsers such as Microsoft Edge. If you experience issues please try using a different browser).
Part One: Passing the Values
Let's look at what happens behind the scenes when the SUBMIT button is clicked. First of all, clicking SUBMIT (referred to as btnSubmit in DESIGN VIEW) results in the control button's ON CLICK event firing. This, in turn, starts the following VBA event procedure (see screenshot below):
 |
| Above: The VBA event procedure for btnSubmit. |
The code begins by declaring a string variable called strOpenArgs:
Dim strOpenArgs AS String
The next two lines of code reference the value entered by the user in the first text box. The value is stored in the strOpenArgs string:
txtValue1.SetFocus
strOpenArgs = txtValue1.Text
The next two lines of code after that reference the value of the second text box, and append it to the strOpenArgs string preceded by a semi-colon (the significance of the semi-colon will be explained in part 3 of this post):
txtValue2.SetFocus
strOpenArgs = strOpenArgs + ";" + txtValue2.Text
This is then repeated for the third text box:
txtValue3.SetFocus
strOpenArgs = strOpenArgs + ";" + txtValue3.Text
So at this point in the program flow, the value of strOpenArgs is as follows:
"one;two;three"
This is the final value of the DoCmd.OpenForm OpenArgs parameter which will be passed to the new form in the following line of code:
DoCmd.OpenForm "frmReceiveOpenArgs", , , , , , strOpenArgs
Part Two: Retrieving the Values
Let's take a look at the new form which opens after the SUBMIT button has been clicked, and the event procedure explained above has finished executing:
 |
| Above: the new form which opens in response to clicking the SUBMIT button. |
As you can see in the screenshot above, the new form consists of three empty text boxes (for displaying retrieved values) and a RETRIEVE button. When the user clicks RETRIEVE the text boxes will be populated with the values submitted from the first form. In our case, Retrieved Value 1 will display the value "one", Retrieved Value 2 will display the value "two", and Retrieved Value 3 will display the value "three".
Let's look at what happens behind the scenes after the RETRIEVE button is clicked. Like the first form, clicking the command button, which in this form is called btnRetrieve, results in it's ON CLICK event firing. This starts the following VBA event procedure (see screenshot below):
 |
| Above: The VBA event procedure for btnRetrieve. |
The code begins by declaring a string variable called strOpenArgs before referencing the forms OpenArgs property and storing its value in the string. (Just to recap, the value of the OpenArgs property (ie "one;two;three") was determined by the OpenArgs parameter of the DoCmd.OpenForm command invoked when the user clicked the SUBMIT button on the previous form):
dim strOpenArgs As String
strOpenArgs = Me.OpenArgs
The next couple of lines of code are very important. A string array called strValues is declared and has its elements populated with data returned from a function called getOpenArgsArray. This function is located in a separate module called Utilities which is global in scope. This is where the core of the processing is done for this exercise:
Dim strValues() As String
strValues = getOpenArgsArray(strOpenArgs)
The purpose of the getOpenArgsArray is to split the value of its parameter, strOpenArgs (which in our case is "one;two;three"), into three separate strings, with each array element containing an individual string. So for us, the strValues array is populated with the following values:
| Array Element | Value |
|---|---|
| strValues(0) | "one" |
| strValues(1) | "two" |
| strValues(2) | "three" |
These values are assigned to each of the three text boxes in the next six lines of code:
Me!txtRetValue1.SetFocus
Me!txtRetValue1.Text = strValues(0)
Me!txtRetValue2.Text = strValues(1)
Me!txtRetValue3.SetFocus
Me!txtRetValue3.Text = strValues(2)
The end result can be seen in the screenshot below:
 |
| Above: the end result after the user clicks RETRIEVE. |
In this way, we have used the DoCmd.OpenForm OpenArgs parameter to pass multiple values to a new form, thereby overcoming the limitation of only being able to pass a single string within the statement.
Part Three: The getOpenArgsArray Function
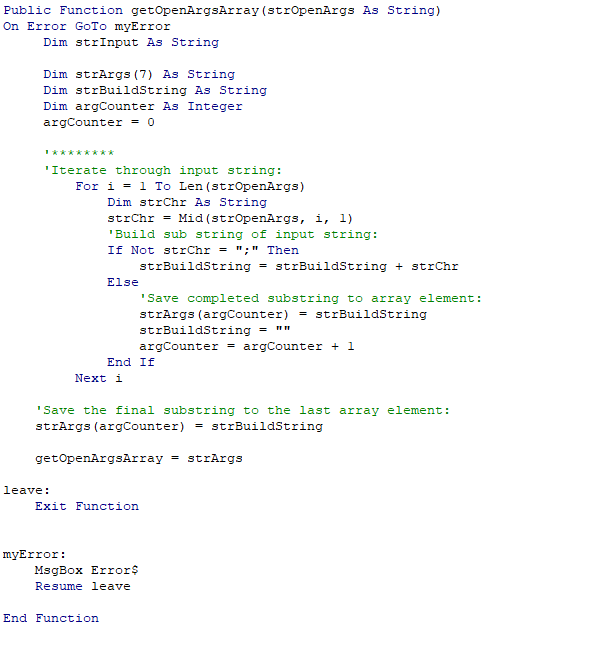
However, this post would not be complete without an explanation of the getOpenArgsArray function, as this is where the core of the processing was done for this exercise. Let's take a look at the code used in the getOpenArgsArray function:
As mentioned in section 2 above, the purpose of the getOpenArgsArray function is to split the value of the strOpenArgs parameter passed to the function, into individual sections, and to save each section as a separate array element. So in our case, the function receives a string containing the value "one;two;three", and returns an array with three elements ie
Array Element
|
Value
|
|---|---|
Element 1
|
"one"
|
Element 2
|
"two"
|
Element 3
|
"three"
|
This is acheived by iterating through the strOpenArgs string in a FOR NEXT loop and appending each individual character to a temporary string called strBuildString. Then when the current character of strOpenArgs in the loop is one of the semi-colons, the value of strBuildString is saved to a new array element.
Lets break this down further.
The following three lines of code are concerned with iterating through each character contained in the strOpenArgs string. Each character is temporarily stored in a string variable called strChr:
For i = 1 To Len(strOpenArgs)
Dim strChr As String
strChr = Mid(strOpenArgs, i, 1)
The value of strChr is then checked to see whether or not it is a semi-colon. If it is NOT a semi-colon, the character is appended to the strBuildString variable :
If Not strChr = ";" Then
strBuildString = strBuildString + strChr
If, on the other hand, the character IS a semi-colon, the current value of strBuildString is saved as a new array element in strArgs(). The strBuildString variable is then cleared ready to build the value of the next array element:
Else
strArgs(argCounter) = strBuildString
strBuildString = ""
The element number of the array is kept track of in an integer variable called argCounter. This is incremented by one after the strBuildString variable is cleared:
End If
Next i
After the last iteration of strOpenArgs has completed, the final array element is saved, and the return value of the getOpenArgsArray function is set to the value of the strArgs() array:
strArgs(argCounter) = strBuildString
getOpenArgsArray = strArgs
Exit Function


