Showing posts with label tables. Show all posts

Friday, 17 May 2019

Linking Access to an Excel Worksheet

Excel is great for number crunching, and can even be used as a basic database to store information.  However, when it comes to displaying and presenting information, the MS Access database has some big advantages over it's peer in the Office 365 suite of software. The reason for this is that Access has a number of tools and features specifically designed to make data easier to read and understand - the Reports facility being just one.

The good news is that Access has the ability to connect to, and work with, Excel data in two different ways.  Firstly, Access can import data from an Excel worksheet into an Access table.  This method lets us work with a "snapshot" of data from Excel as it was at the time the data was extracted (there is more information about importing from Excel in my post on "Importing and Exporting Data between Access and Excel").  The second method is to set up a "live" link between the Excel worksheet and the Access table. This has the advantage of giving us direct access to current data in the spreadsheet; so any updates, additions or deletions will show up in Access (after data is refreshed/reloaded) as soon as the data is saved in Excel. However, please do note that this connection is read-only; new data cannot be saved back into the Excel spreadsheet without specifically doing an additional export.

Today we are going to learn how to set up this "live" link. To do so, I have set up a sample Excel worksheet with fictitious personnel records.

Linking to Excel
  1. Create a new Access Database, or open an existing one.
  2. Select the EXTERNAL DATA ribbon.
  3. Click the NEW DATA SOURCE icon in the IMPORT AND LINK group.
    External Data Ribbon
    Above: Adding a New Data Source from the External Data ribbon.
  4. Select FROM FILE from the drop-down menu, and then EXCEL from the sub-menu.  This opens the GET EXTERNAL DATA - EXCEL SPREADSHEET dialog form.
    Get External Data - Excel Spreadsheet dialog form
    Above: The Get External Data - Excel Spreadsheet dialog form.
  5. Click the BROWSE button and select the Excel spreadsheet you want to link to.
  6. Click the LINK TO A DATA SOURCE BY CREATING A LINKED TABLE radio button, and then click OK.  
  7. The next page of the wizard opens where you should see a sample of the worksheet you are linking to.  If your worksheet had column headings, ensure the FIRST ROW CONTAINS COLUMN HEADINGS box is ticked, and click NEXT. (Please note that if your spreadsheet has more than one worksheet or named range, you will see an additional wizard page asking you to select the specific worksheet or range before the page in the screenshot below).
    MS Access - Link Spreadsheet Wizard
    Above: First page of the Link Spreadsheet Wizard.
  8. Enter the name you are going to call the linked Access table in the last page of the wizard, and click FINISH.

Once you have done this, you will see the new linked table appear in the left-hand Access navigation pane under TABLES.  Note how the linked table icon is a blue arrow pointing to the Excel logo, thereby indicating the table is linked to an Excel spreadsheet.

MS Access table linked to Excel
Above: The table linked to Excel.


Now the link has been established to the Excel worksheet, we are free to base forms, reports and queries on the linked table as if it is native to Access itself.


Thursday, 27 December 2018

Adding rich text formatting to Access data


When we store information in an Access for Office 365 database, text formatting (eg setting text as bold or italic, and changing font size etc) isn't normally a consideration. For example, if we have a field storing a title, it is very unlikely that we would need to save the titles' font size.  This is something we can add later to a text box property of a form or report where the date is presented to the user.

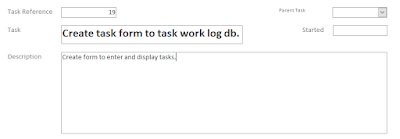
Formatted Access 365 text box
Above: notice the text box for the task field
 is in a larger font with bold text. 
Access 365 text box properties
Above: the property sheet where
 the db designer sets formatting
 properties of the text box. 

However, there are certain instances when we do want to save formatting information relating to the data stored in a particular field of a table. This may be the case when a field contains a large amount of textual data, and we want the user entering the data to decide which text within the field is formatted in a particular way; not the database designer who can only apply formatting to all text displayed in any given text box control.

So how do we add rich text formatting to an Access for Office 365 database field?  


Rich text formatting is achieved through the addition of html markup tags to the text they relate to.  These are the same tags used by web pages for formatting content.  However, we don't need any knowledge of HTML markup, because Access for Office 365 does it for us.  All we need to do is change the TEXT FORMAT property of the field within the database table.  NB this can only be done on a table field set to the LONG TEXT datatype.

Here are the instructions for setting up a LONG TEXT field for rich text formatting:
  1. Open (or create) the table containing the field to be set to rich text in DESIGN VIEW.
  2. Change the data type for the field to LONG TEXT in the TABLE DESIGN GRID.
    Above: the entry field being set to LONG TEXT.
  3. Change the TEXT FORMAT property to RICH TEXT in the field property grid.
    Above: changing the TEXT FORMAT property to RICH TEXT.

We can now change from TABLE DESIGN VIEW to DATASHEET VIEW and add rich text formatting to data stored in the field we have just modified.  Do this by highlighting some text within the field and selecting the desired formatting from the context menu that opens automatically. Alternatively, you can also use the TEXT FORMATTING  group of icons from the HOME ribbon.
Above: an example of rich text formatting within an Access for Office 365 table field.

Displaying formatted data on Access for Office 365 forms and reports.

Now that we have set up the table for rich text formatting, there is one other thing we need to do if we want to display our formatted data in a text box control on a form or report. This involves changing the text box's TEXT FORMAT property to RICH TEXT.
  1. Open the form containing the text box we want to change in DESIGN VIEW.
  2. Select the text box control by clicking it in the design grid.
  3. Open the properties sheet by clicking the PROPERTIES SHEET icon from the DESIGN ribbon.
  4. Click on the DATA Tab on the properties sheet, and change the TEXT FORMAT property to Rich Text.


When we now re-open the form in FORM VIEW, rich text formatting is applied to any text the user had previously set before it was saved in the forms underlying table. 

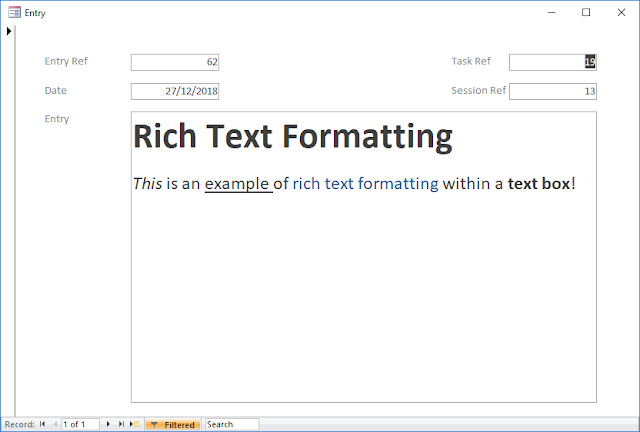
Access 365 Rich Text Formatting Example

Above: an example of rich text formatting within an Access for Office 365 text box control. 
Had we left the TEXT FORMAT property as PLAIN TEXT, any data displayed in the text box would 
not have been formatted; any text that should have been, would have appeared in plain text between html markup tags.

Friday, 4 May 2012

Using the Access Database Splitter

Last year I wrote a post on Linking to an External Data Source.  This is where we split an Access database  into a Back End (which stores all the tables and data), and a Front End (which contains all the forms, queries and reports).  There are a number of advantages to observing this practice.  To begin with, splitting a database file in this way is all but essential if it is to be deployed on a network in a multi-user environment. Another big advantage is that we can easily replace a front end file with a new updated version with minimal disruption - the actual data stored in the back end tables is not touched in this process. 

If you read the my post last year, you may remember that I showed you how to link a front end Access file to an existing back end database.  This is fine if the back end database already exists, or if you decide to create the application in two separate files from the start.  However, many developers create or inherit a complete database application as one stand alone file, and then proceed to split the database.  Splitting the database can be done manually, but this is often time consuming and there is always the possibility of making errors in the process.  An easier and quicker way of doing this is by using the Access Database Splitter.  This is a wizard that splits the database into a front and back end, as described above.  

Splitting an Access Database
The database that I am working with here is an Order Management System containing a number of tables.  If you want to try this on one of your own database files, it does not matter how many tables it contains - it could have a hundred or it could just have one.  
Figure 1
  1. Click the ACCESS DATABASE icon (located in the MOVE DATA group of the DATABASE TOOLS ribbon).  See figure 1 on on the right.  This opens the DATABASE SPLITTER Wizard.
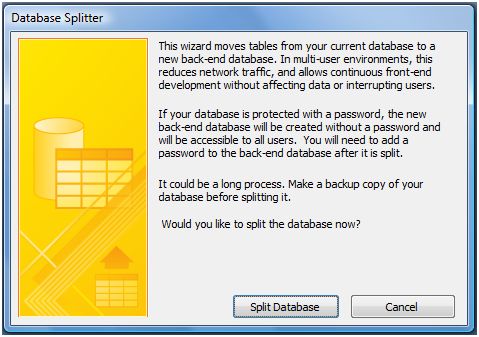
  2. Click the SPLIT DATABASE button at the bottom of the Wizard (see figure 2).   
  3. You are now asked to select one of your folders for the new back end Access file.  Browse to a location of your choice, enter a back end file name, and then click SPLIT.  After a moment or two, you should get a message box saying "Database Successfully Split".
  4. Click OK.
Figure 2: The Database Splitter Wizard from Stage 2.
You can now look at the navigation pane of the front end database and see the linked tables (see figure 3).  You can try adding data to one of your tables and then open the back end file to see it stored there.  You could also try copying the front end file in order to access the back end tables with different front ends.  In so doing you can see the basic principle behind how multi-user systems operate*.
Figure 3 (above): This is how linked tables appear in the Front End Database file.
Figure 4:  Your Database is now split into two files one for the front end and one for the back end.

*Tip:  If you want to run more that one Access front end at a time, you will need to open multiple instances of the Access Database.  So rather than clicking on the access front end file directly (ie from within Windows Explorer), you should open Microsoft Office Access from the windows START button or DESK TOP and then open each front end file from the GETTING STARTED WITH MICROSOFT OFFICE ACCESS screen.   

Friday, 10 June 2011

Linking Access to an External Data Source

There are many reasons an Access Developer needs or chooses to link an Access database to an external Data Source.  One common reason is to increase efficiency when a team of users need simultaneous access to a database across a Local Area Network. A common practice is to store an Access file containing the database tables in a shared folder.  This is referred to the Server or Back End.  Individual Users then have a local Access database stored on their own PC's which is linked to this Server.  Each one of these local database files contains all the Access Forms, Queries, and Reports, and are referred to as Client's or Front End's.  The logic behind this set up is that once data is downloaded from the Server, any processing that is required can then be done locally, thereby freeing the Server to deliver information to other Client's on the network.

In this exercise we are going to have a go at linking an Access Database to an External Data Source.   You don't need to be on a network to try this.  The general principle of Linking works exactly the same when the Client and Server database files are stored on the same machine, and even in the same folder.

Before you begin, you will need to create a new database containing a table. Call the database LinkTestServer.accdb. This will be the data source that we will be linking to.  A simple table of made up names will do fine for this.  Alternatively, you can download this example Link Test Server Database to use for the purpose.  Once you have done this we can begin by creating the Client database, and then link it to the Server file.
  1. Open Access and Create a New Database.  You can save it in the same folder as the Server file.
  2. Select the EXTERNAL DATA tab on the Access Ribbon.
  3. In the Ribbon's IMPORT group, click the IMPORT ACCESS DATABASE icon.


  4. This opens the GET EXTERNAL DATA dialogue box.  Here we need to browse and select the name of the Access Database that we are going to use as our Server or Data Source. You will also need to click the lower option box where it says LINK TO THE DATA SOURCE BY CREATING A LINKED TABLE.


  5. Click OK.
  6. The LINK TABLES dialogue box now opens. This lists all the tables in the Server Database.  In our example there is just one: tblCustomer.  Click the name so it is highlighted in blue.
  7. Click OK to complete the linking process.
You should now see the linked table represented in the NAVIGATION PANE of your Client database.


As you can see from the screen shot above, it looks similar to an ordinary 'native' table, except there is a blue arrow to its left, indicating it is a linked table.  You can now open it from within the Client database and add additional names to it as if it was a native table.  You may also base Forms on it, Query it and Create Reports from it too.  It is just the same as working with a native table except you cannot modify the table design (eg add or change fields ... etc).  The table is still located externally, but any additions, deletions or edits you make to the table's data from the Client database is reflected in the data stored in the Server database. You may like to experiment with this and see for yourself.