This post complements yesterdays article on
Customizing an Access Form. This time we are going to look at
Creating an Access 2007 Form from scratch.
1/ Begin by clicking the
Form Design Icon on the
Create Ribbon. This opens a blank new form in
Design View.
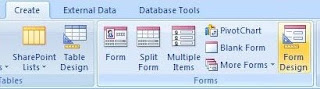
The Form Design Icon on the far right of the Create Ribbon.
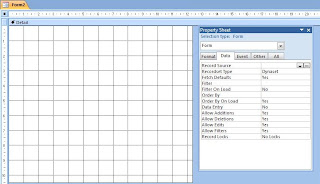
Form Design View and the Property Sheet.
2/ Before we start creating text boxes and other form controls, we are going to
bind the form to an Access Table that has already been created. This is so Access knows where your forms' data is going to come from. We do this by setting the
Record Source property. If the property window is not already open, click the
property sheet icon in the
Tools group of the
Design Ribbon.
3/Select the
Data Tab of the property sheet. This will display a grid of properties relating to your form's data. It is the
Record Source property that we are currently interested in. Click the arrow to display a drop down list of potential database tables and queries that we can use. In this example we are going to use the table called
tblAccounts, which we will select by clicking.
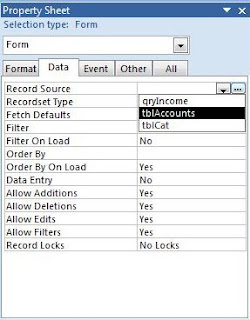
Record Source property and the Property Sheet.
4/ We are now in a position to begin adding form Controls such as
Text Boxes and
Labels. These are located in the
Controls group on the
Design Ribbon. We shall now click on the text box icon and then move then cursor to the area of the form where we would like it to go. Then simply right click the mouse over this point. This will place the text box control on our form.
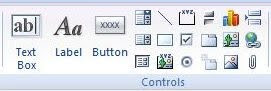
The Controls group of the Design Ribbon.
The Text Box control is on the far left of the image.
5/ We shall now set the
Control Source property of the text box. This determines which field from the form's
Record Source will be bound to the control. Do this by clicking the arrow to display a drop down list of field names from the table which we earlier selected as our record source. We shall choose the
Description field. Like in stage 3, simply click the field name in the list to select.
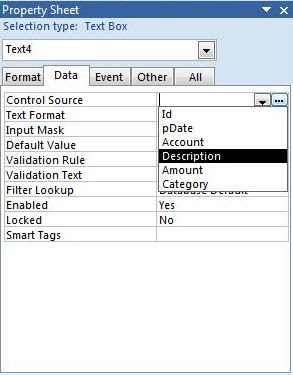
The Control Source Property.
Selecting a field name from the drop down list.
6/ You can now give your control a meaningful name. This is now displayed anywhere on the form itself, but it will be the name that you use to reference it later on in the design process. Do this by clicking the
Other tab of the property sheet. The
Name property should be at the top of the grid. Access gives it a default name such as
Text1. You can simply type the name
Description over this on the grid.
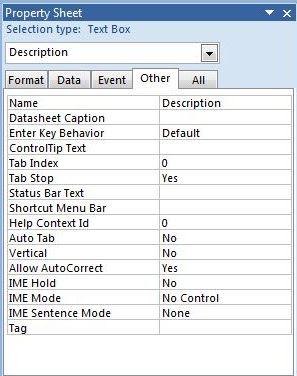
The Name Property for our text box control.
7/ We shall now change the
Caption property of the label on the left of the text box. Unlike the
Name property which we set in the previous stage, the
Caption is displayed on the form to provide information to the user. In this case, it is going to tell the user that the information to enter in the text box is going to be "Description". Do this be selecting the label on the design grid by right clicking so that it goes orange. Next click the
Format Tab on the property sheet and type in "Description" on the property grid. Alternatively you can click the label on the design grid to select, and then click inside the label to overwrite the old label caption directly.
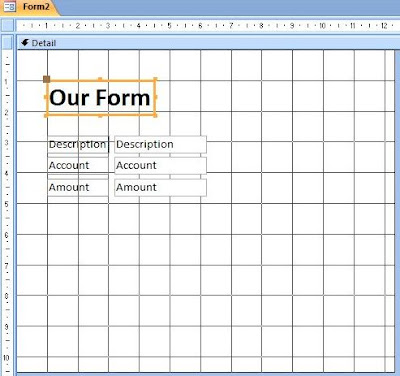
You can now repeat this stage, adding as many text box controls as you need.
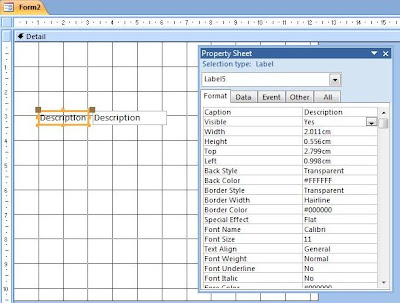
The Caption Property for our Label control.
8/ We will now finish off the form by entering a title. Do this by clicking on the
Label control on the
Controls group of the
Design Ribbon. Then choose a position at the top of the grid, and click to add the label control to our form. We can now add our title text the same way as we entered the caption in the previous stage. Once we have entered the title caption, we can now increase the font size and make the text bold. Do this by right clicking the label to select, and entering a new
Font Size of 24, and clicking
Bold in the
Font group of the
Home Ribbon. You will also need to resize the label by double clicking the the notch on the labels border.