Showing posts with label functions. Show all posts

Sunday, 24 March 2024

Static Variables Part 2: the Advantage of Static Variables

In part one of this tutorial - Using Static Variables - we examined the difference in behaviour between an ordinary local variable and a static variable.  We learnt that whilst both types can only be referenced within the same sub procedure or function in which they were declared, the value of a static variable is retained after code in the sub procedure or function has completed execution.  The terms we used to understand this behaviour were scope and lifetime respectively.

In part two, this current post, we are going to consider how we can use the unique scope and lifetime of a static variable to our advantage.  In order to illustrate this we shall examine the workings of an order counter custom control comprised of a textbox and two control buttons.


An Order Counter Control

This sort of control may be familiar to you if you order your groceries online. It usually appears under an image of a product and allows the customer to set the order amount by clicking the plus and minus buttons without having to type in the actual number in the textbox.  It is of interest to us because it lends itself to the use of a static variable to keep track of the order amount.


The advantage of Static Variables

So what is it about static variables that make them advantageous to use in contexts such as that of our order counter control?  To understand this lets take look at how the VBA code used to power this it is organised.


VBA Code Powering the Order Counter

As we can see, the coding for the form containing the order counter is comprised of five sub-procedures and a general declarations section where three constants, INITIALIZE, INCREMENT, and DECREMENT are declared.  Three of these sub-procedures, Form_Load(), cmdMinus_Click(), and cmdPlus_Click(),  contain event handling code which execute when the form opens, or the minus and plus buttons are clicked, respectively.  Each consist of one statement calling changeOrderAmount(...), the sub-procedure used to calculate the order amount displayed in the txtOrderValue textbox.  This is the location where our static variable, intOrderAmount, is declared.

It is in the changeOrderAmount(...) sub-procedure where the value of intOrderAmount is initialized, incremented or decremented within a SELECT...CASE statement, which is, in turn, based on the value of the intApplyChange argument it received when called. For example, if the  INCREMENT constant was received, the value of intOrderAmount is incremented by 1.  Likewise, DECREMENT decreases the value by 1, and INITIALIZE sets the value to 0. Note the fact that the actual order amount is not set directly when incremented or decremented, but is calculated from its previous value.  For this reason intOrderAmount has to persist across multiple calls to the sub procedure, and is why it is declared as Static.

In order to achieve the above without using a static variable, we could instead declare intOrderAmount in the general declarations section of the form's code module using a Dim  statement or the Private keyword. This gives the variable a module level scope and lifetime: it can now be referenced from any sub-procedure or function within the same module, and any value it contains will be retained while the form connected to the module remains open.  As such, the module level version of intOrderAmount has the same lifetime as our original static version declared within the changeOrderAmount(...) sub-procedure. However, since the variable only needs to be referenced from within the sub-procedure, to give it module level scope in the above mentioned way will leave it unnecessarily exposed to accidental editing as well as making our code less easy to read.

These issues arising from module level scope become more pronounced as more code is added to the module.  Other functions and sub procedures are likely to use their own variables, some of which may also have module level scope. These are generally less easy to keep track of because they can be modified from any location in the module, often under a variety of different conditions. In this sort of context it becomes increasingly difficult to read and understand our code, and  there is a greater chance of accidentally referencing a different variable to the one intended, especially if it has a similar name or performs a similar role. As such, using a static variable with a scope local to the sub-procedure or function in which it is declared, whilst also retaining it value over multiple calls, is the much better option.


Conclusion

The advantage of using static variables lies in the fact that they are, on the one hand,  declared within a sub-procedure or function, and thereby have a local scope; and on the other hand, retain their value once code in the parent sub-procedure or function has completed execution.  As a result, the variable is protected against accidental editing from code elsewhere in the project, whilst retaining its value in order to keep a running total over multiple calls to its parent sub procedure or function.  Furthermore, since static variables are declared within sub-procedures or functions, as opposed to an external location in the project, our code is more manageable, and hence easier to read and understand.  Generally speaking, our code is more streamlined and robust.


Wednesday, 21 February 2024

Display a Random Customer Record using VBA and Form Filter

Suppose you are responsible for managing an Access Database containing customer records.  You have been asked to introduce a contact management feature whereby the person operating the database can extract a random customer record.  This blog post walks you through the VBA code needed to generate a random number and use it to filter out a customer record, all at the click of a form button.

In order to demonstrate this we will be using the following data:


Table of Fictitious Customer Records


We will display the random customer record on the following form:


The VBA code starts when the user clicks the "Get Random" button to display a random customer record on the form. Lets begin by creating the control button.


Creating the Control Button

1. Open the form in DESIGN VIEW
2. Click the BUTTON icon in the CONTROLS group on the FORM DESIGN ribbon.
3. Click the location on the form grid where we will be positioning the button.  Resize the control button by clicking on one of the buttons' corner or edges and dragging to enlarge or contract as appropriate.
4. Click the PROPERTY SHEET icon from the TOOLS group of the FORM DESIGN ribbon if it is not already open.
5. Ensure the control button is selected. Click the button to select if it is not. Now the property    sheet is displaying the properties specific to our button.
6. Change the button CAPTION property on the FORMAT tab to "Get Random".
7. Change the button NAME property on the OTHER tab to "btnRnd"

Check how the button looks by changing  to FORM VIEW from the VIEWS group of the FORM DESIGN ribbon. If its OK, we are now ready to add the VBA code which runs when the command button is clicked.


Adding the VBA Code

1. Open the form in DESIGN VIEW, and reopen the PROPERTY SHEET if it isn't already.
2. Select the control button by clicking on it.
3. Select the EVENT TAB on the PROPERTY SHEET, and click inside the grid cell adjacent to where it says ON CLICK.
4. Click the ellipse button ("...") at the end of the cell to open the CHOOSE BUILDER dialog, Select CODE BUILDER from the drop down list and click OK to open the VBA editor.
 

You should now see an empty sub procedure called btnRnd_Click(). This is the control button's event handler.  This means the code we enter here will run when the user clicks the command button at runtime.


The VBA to Generate a Random Number

In order to retrieve a random customer record we need to generate a random number which corresponds to one of the customers in the database table. We can do this using an inbuilt VBA function called Rnd.  This generates a random decimal number between 0 and 1. For example, it  may return the value 0.5924582.  For this to be of any use to us, we need change the decimal number to an integer and multiply it by the number of customer records in the table.  So, for example, our table contains 10 customer records so we need to multiply the value returned by rnd by 10 and use another function called int to convert it from decimal to integer. We do this as follows:

    Int(rnd * 10)

This returns a value between 0 and 9.   We now need to add 1 to the value to get a number between 1 and 10:

    Int(rnd * 10)+1

Just one more thing to note: computers are unable to return a true random number on their own.  They return a seed number based on a pre-existing sequence of numbers. However, when we initialize the random number generator with the Randomize statement, the seed number returned is based on the system timer, which effectively makes the returned value a true random number.

So to put all this together we are going to create our own custom function to return a random integer number based on the number of records in our database table. The number returned will correspond to a particular record in the table. We shall call our function getRandom and will pass the number of customer records as the parameter. The code for the function is as follows:


Private Function getRandom(intRecordCount As Integer) As Integer  
    Randomize
    getRandom = Int((intRecordCount * Rnd) + 1)  
End Function

For more information on how custom functions work, please check out my post on Writing Custom Functions for Access VBA.

The next step is to write the VBA code to connect the random number returned by our getRandom function with it's corresponding customer record in the database table.  We shall do this by looping through a DAO Recordset containing records from the customer table.


Looping through the DAO Recordset


Before we can create the code to filter a customer record based on our random number, we need to find a way of mapping any potential number returned by the getRandom function  (in our case this is between 1 and 10) against the records in the database table. Whilst it is tempting to use the returned random number directly against the value stored in the customer_id field in a form filter WHERE clause - ie "customer_id = " & getRandom(intRecordCount) - there is a problem with this.  That is to say, although the customer id's in our table go up in an unbroken sequence from 1 to 10, it is possible that one of these records will be deleted in the future.  If and when this happens, no customer record would be found using the above WHERE clause if the random number corresponded to the deleted record. Moreover, the record count would not include the deleted record so the random number returned would be within a range which did NOT include the last record in the table.

What we must do, therefore, is create a DAO Recordset containing all the records in our customer table and use the value returned by getRandom to step through each customer record in the set until this value has been reached - eg if getRandom returns the value 8, we simply loop though the recordset to the 8th record contained therein.  Once we get to this record we can look up the actual value in the customer_id field, and then use this as the basis of our form filter WHERE clause.

If you are unfamiliar with how DAO recordsets work, you may want to check out my post on Accessing Data with VBA Code - Introducing the DAO Recordset; otherwise, lets jump straight in, and run through the code we will be using.

The first step is to create a new instance of a DAO recordset object and set its value to that of our  tblCustomer table.

Dim rstCustomers As DAO.Recordset
Set rstCustomers = Application.CurrentDb.OpenRecordset("tblCustomer", dbOpenSnapshot)

You may have noticed the second parameter we have used when opening the recordset is dbOpenSnapshot.  This means our recordset will be a static snapshot of the customer table. Unlike the versatile dbOpenDynaset type, records cannot be updated using dbOpenSnapshot, but in cases where editing is not required, the snapshot type is the more efficient option. 

In the next step we are going to count the number of records in the rstCustomers recordset and store the value in an integer variable called intCount.  To count the number of records in rstCustomers we will read the RecordCount property using the following syntax:  rstCustomer.RecordCount.  However, before doing so, it is first necessary to visit all the records in the recordset so they can all be counted. The best way to do this is to use the recordset MoveLast method which moves the recordset cursor though each of the records before pointing to the last record in the set. The syntax for this is rstCustomers.MoveLast. All this is done in three lines of code as follows:

Dim intCount As Integer
rstCustomers.MoveLast
intCount = rstCustomers.RecordCount

Now that we know how many records are in the customer table, we can use our getRandom function, passing intCount as the parameter, to obtain a random number.  We then step through the records in the recordset until we reach this number.  Once this record has been reached, we can read the value contained in the customer_id field.  

To do all this we shall begin by defining an integer variable called intCustomerId.  This will be used to store the customer id once we have arrived at the random customer record.  Before we set up the loop, we need to move the recordset cursor back to the first record using the MoveFirst  method.  This is because the cursor is still at the last record from when did the record count in the section of code above.  We will use a For...Next loop to step through the recordset, starting at the first record and ending at the record which corresponds to the value returned by our getRandom function. This is done with the following line of code: For i = 1 To getRandom(intCount).  The first statement within the loop sets the value of the intCustomerId variable to the value contained in the customer_id field of the record where the recordset cursor is located. We reference the field value using the recordset name ("rstCustomers") followed by an exclamation mark ("!") and then the field name ("Customer_Id") as follows: intCustomerId = rstCustomers!Customer_Id. Once this value is stored in our intCustomer variable we can move the recordset cursor to the next record using the MoveNext method: rstCustomers.MoveNext. Finally the loop counter is incremented by 1 with Next i.  If the end value of the loop counter had been reached before the Next statement had executed, the loop counter will still increment by 1, but the program flow will exit the loop and move to the statement following Next i.  

Dim intCustomerId As Integer
rstCustomers.MoveFirst
For i = 1 To getRandom(intCount)
           intCustomerId = rstCustomers!Customer_Id
           rstCustomers.MoveNext
Next i    


So we have stepped through the recordset and arrived at our random record storing the value of it's customer_id field in the intCustomerId variable.  Now the program flow has exited the loop we are going to use the intCustomerId value to display the record on our form.  This will be done by means of a form filter containing a WHERE clause based on the stored customer_id. The syntax for the WHERE clause is "Customer_id = " & intCustomerId and the syntax to create form filter is DoCmd.ApplyFilter filtername, whereclause, controlname.  Although the ApplyFilter method has three parameters, we are just going to use the second - the WHERE clause.  As such we write the full statement as follows:

DoCmd.ApplyFilter , "Customer_id = " & intCustomerId

(NB Although the first parameter is left blank we still need the separating coma just before the WHERE clause string.  The last parameter is also left blank, but a separating coma after the WHERE clause is not needed.)

Lastly we need to close the rstCustomer recordset and set its value to NOTHING.  This clears the memory that it had been taking up and allows us to reopen the recordset again the next time the user clicks the getRandom button. We place this code within a IF conditional statement which checks the recordset is still open before it executes thereby avoiding any error from occurring if it is not.

If Not rstCustomers Is Nothing Then
    rstCustomers.Close: Set rstCustomers = Nothing
End If


All we need to do now is look at how all the code we have run through above is organised in the code module for the frmCustomer form.


As you can see from the screenshot above, our code is divided into two Sub Procedures and one Function, btnRnd_Click(), RandomCustomerRecord() and getRandom() respectively.  When the user clicks the Get Random button on the Customer Form, the code in the btnRnd_Click() sub executes first. This is the event handling sub that Access created automatically when we set up the control button at the start of the tutorial.  There is just one statement here calling the second sub procedure which is RandomCustomerRecord().  This contains the main body of the code for retrieving the random customer record from the database and displaying it on the form.  The reason for giving this it's own sub rather than placing it in the code handler, is that we can potentially reuse this code by calling it from different locations in the program as required.  The only task this code does not do is generate the random number representing a specific customer record for selection.  This code is located in the getRandom() Function which is called from the FOR statement of the FOR...NEXT loop. The number returned from the function determines how many records are stepped through in the rstCustomers recordset before getting to the record which is to be displayed right at the end of the process.

Once RandomCustomerRecord() has the random number and retrieved the customer record from the recordset, the form filter is applied using the value of cutomer id.  The form will then display the record with the same customer_id as that stored in the sub's intCustomerId variable.


And there we have it: a random customer record at the click of a button! 


Friday, 5 April 2019

Using Custom Functions in Calculated Controls

Back in May 2012, I wrote a blog article on Writing Custom Functions for Access VBA.  Custom functions work the same way as MS Access built-in functions such as DateAdd, DatePart and DSum, but are instead created ourselves as database developers.  We do this by creating a public function with the VBA programming language and save it inside a global module within the database.

The blog I wrote in 2012 explained how these custom functions can be accessed from sub procedures associated with forms and reports elsewhere in the database.  Today, however, I am going to explain how custom functions can be utilised in calculated form controls, without needing to invoke them with VBA itself.

Let's begin by looking at the custom function we are going to use.

Custom Function to get Week Commencing
I have created a custom function called getWeekCommencing to calculate the week commencing date of a given week, in a given year.  For example, the week commencing date of the 14th week of 2019 is 1st April 2019 (if we count Monday as the first day of the week). As such the function takes two arguments - week number and year.  The full syntax for using the function is as follows:

getWeekCommencing(weekNumber, Year)

The code I used to create this function is as follows:

Public Function getWeekCommencing(intWeekNo, intYear)
On Error GoTo myError

    Dim intJan1 As Integer
    Dim varStartDate As Variant  
    intJan1 = Weekday(DateSerial(intYear, 1, 1), vbMonday)
    varStartDate = DateAdd("d", -(intJan1 - 1), DateSerial(intYear, 1, 1))
    getWeekCommencing = DateAdd("ww", intWeekNo - 1, varStartDate)  
leave:
    Exit Function
myError:
    MsgBox Error$
    Resume leave  
End Function


If you are unfamiliar with VBA you can still copy this code into your database and use it within a calculated control. There are instructions for doing this below:

Instructions for adding the function to your database.

  1.  Copy the code above onto your clipboard.
  2.  Open the database you are going to add the function to.
  3.  Select the CREATE ribbon.
    Above: The MODULE icon is located on the right-hand side of the CREATE ribbon.

  4. Click the MODULE icon from the MACROS AND CODE group.  This opens the VBA editor and creates a new module ready for the code to be added:
  5. Paste the code into the VBA editor as in the screenshot below:
Above: The VBA Editor:
You may notice that I have changed the default name of the Module (see the PROJECT EXPLORER in the 
left-hand side bar) from Module 3 to "myFunctions".  You can do the same by highlighting the module name in the 
project explorer and hitting the F4 button to bring up the PROPERTIES window. You may then change the name property
 to one of your choice.  However, this is not essential.
The custom function is now ready to use in a calculated form control. 
Setting up the Test Data for this Exercise

Before we create the form to test the function, we first need to set up a simple database table containing test data. The table needs just two fields: WeekOfYear and Year, both of which are of the NUMBER data type.

Above: tblWeeks in Design View

Above: tblWeeks in Form View with test data entered.


Once the table is set up, we can add our test data as I have done in the screenshot above. Although there are  52 week in the year, the first week may not start on a Monday, so the data entered in WeekOfYear field can be anything between 1 and 53 (so the possibility of a partial first week is offset by Week 53).

The Calculated Control

Now we have added the getWeekCommencing function along with test data to our database, we can create the form containing the calculated control.

Above: The Week Commencing Calculator form in Design View.


To do this we need to create a form bound to the tblWeeks table.  We then need to add three text boxes:  the first text box (txtWeekOfYear) is bound to the WeekOfYear field in tblWeeks, and the second (txtYear) is bound to the Year field.  The third text box (txtWeekCommencing) is unbound.  This is where we are going to add our calculated control which returns the week commencing date (based on the data displayed in the WeekOfYear and Year textboxes).

Here are the instructions for creating the calculated control:

  1. Create the third text box that we are going to use for the calculated control as in the screenshot above. 
  2. Display the PROPERTY SHEET if it is not already visibile.  The PROPERTY SHEET icon is located in the TOOLS group of the DESIGN ribbon.
  3. Select the new text box by clicking on it.
  4. Click the OTHER tab of the PROPERTY SHEET, and change the NAME property to txtWeekCommencing. (I also suggest you change the names of the first textbox to txtWeekOfYear and the second to txtYear by selecting them and changing the NAME properties).
  5. Click the DATA tab on the PROPERTY SHEET (having first selected txtWeekCommencing).  We are now going to enter an expression which uses our getWeekCommencing custom function.  
  6.  Enter the expression below directly into the CONTROL SOURCE property:
=getWeekCommencing([txtWeekNumber],[txtYear])

The txtWeekNumber parameter references the value in the txtWeekNumber textbox, and the txtYear parameter does the same for the txtYear text box.  

In this exercise, the expression was entered directly into the CONTROL SOURCE
property.  Alternatively, we could have clicked the elipse button at the end of the CONTROL SOURCE
property row to open the EXPRESSION BUILDER.  Using the Expresison Builder is, however, something 
I would need to cover another day, in another post!
And that's it! All you need to do now is save the form and open it in FORM VIEW.  Use the form's navigation buttons to view each record in the tblWeeks table.  The calculated control uses the getWeekCommencing custom function to processes the week number and year data for the current tblWeeks record, and displays the appropriate date.

NB - Just to clarify, the format for the week commencing date in this screenshot is for the UK (ie dd/mm/yyyy). 
The same date using the US format would be 01/07/2019 (mm/dd/yyyy). However, your computer should be set up
to display the date format appropriate for your location automatically.


Saturday, 2 March 2019

Converting Minutes to Hours:Minutes in MS Access

There may be occasions when we need to convert the difference between a start time and an end time, and display the result in hours and minutes.  For example, suppose we set up an Access table field to record the time a person starts work (the session_start field) and another to record when s/he finishes (the session_end) field.  Rather than set up a third field to store the total time worked, we can instead calculate this value automatically using a calculated control in an Access form, or a calculated field in an Access query.

Calculated Control
Above: the bottom text box (txtHoursWorked) is a calculated control. 
The CONTROL SOURCE is an expression based on the values contained in the top two text boxes
(bound to the session_start and session_end fields in the undelying table).

However, to do this we must use two expressions to calculate the time difference, and then display the time difference in the hrs:mm format.  So if we enter 20:40 as the session_start, and 22:06 for session_end, we need an expression to calculate the total minutes worked (which in this case is 86 minutes), and then convert the total minutes to hours/minutes format (which would be 01:26).  To achieve this we use the DateDiff and FormatDateTime functions.  Lets take a look at each function individually before combing them to produce the required result.

The syntax for the DateDiff function is as follows:

DateDiff("interval", time_1, time_2)

The function works by calculating the time difference between the time_1 and time_2 parameters, and returns the result in accordance with the interval parameter.  In our case, we want need the result returned as minutes, so enter "n" as interval.   Time_1 and Time_2 correspond to the start time and end time.  To get these values for the expression, we can we put a reference to the values contained in the text boxes for "Start time" and "End time".  In our example these text boxes are called txtStartTime and txtEndTime.  This what our DateDiff function looks once we add the parameter values:

DateDiff("n", txtStartTime, txtEndTime)

The value returned in our example is 86 minutes.

The second function that we are going to use is FormatDateTime which converts the value returned by the DateDiff function into hours and minutes.  The syntax we need to use in the FormatDateTime is as follows:

FormatDateTime( (minutes/(24*60) , named_format)

This first parameter is a division of the number of minutes (returned in the DiffFunction) by the total number of minutes in a day -  which in our example is 86/(24*60) - and returns the result in accordance with the value contained in the named_format parameter.  The latter is a numeric value indicating the required time format - which in our example is vbShortTime ie hours:minutes.  The numeric value we enter for the vbShortTime format is 4.  This is what our FormatDateTime function looks like once we add the parameter values:

FormatDateTime((86/(24*60) , 4)

The value returned from this expression is 01:26 - ie 1 hour and 26 minutes.

When we come to enter the actual expression used as the control source for the TOTAL (HRS:MINS) text box (referred to as txtHoursWorked in the screenshot below), we need to combine these two functions by nesting the DateDiff function inside the first parameter of the FormatDateTime function. This is done as follows:

FormatDateTime((DateDiff("n", txtStartTime, txtEndTime/(24*60) , 4)

Finally, we just need to enter this expression into the CONTROL SOURCE property of the
txtHoursWorked text box (see screen shot below):

The txtHoursWorked text box is highlighted on the left, and the expression used as the CONTROL SOURCE property value is highlighted on the right.


Friday, 25 January 2019

Passing Multiple Values via the OpenArgs Parameter of DoCmd.OpenForm

The DoCmd.OpenForm command is a useful tool for the Access for Office 365 database developer wanting to control the manner in which a form opens during runtime.  I have written about it previously in my post on how to "Control Form Opening".  However, in today's post, we are going to focus on a specific area of this command's use - that is, how we can pass multiple values via its OpenArgs property.


The OpenArgs parameter of DoCmd.OpenForm gives us the means to pass a single string value to the OpenArgs property of new form being opened.  After the form has opened, this value can then be read and used by any code able to reference the new forms OpenArgs property. As things stand, the limitation of this is that we can only pass one string value as the command executes.  So let's see how we can get around this, and pass any number of strings values in one go.

To demonstrate how this works, I have created an Access for Office 365 form containing three text boxes and a submit button.  When the user populates the text boxes and clicks SUBMIT during runtime, the values contained in each of the three text boxes are passed over to a new form by means of the OpenArgs parameter of the DoCmd.OpenForm command.

Above: Form to pass multiple values via the OpenArgs parameter of DoCmd.OpenForm.

You can download the full OpenArgsPost.accdb database used in the this exercise from here. 

(NB I have tested the download process using the Chrome browser which works OK.  The download process may fail using other browsers such as Microsoft Edge. If you experience issues please try using a different browser). 


Part One: Passing the Values

Let's look at what happens behind the scenes when the SUBMIT button is clicked.  First of all, clicking SUBMIT (referred to as btnSubmit in DESIGN VIEW) results in the control button's ON CLICK event firing.  This, in turn, starts the following VBA event procedure (see screenshot below):

Above: The VBA event procedure for btnSubmit.


The code begins by declaring a string variable called strOpenArgs:

Dim strOpenArgs AS String

The next two lines of code reference the value entered by the user in the first text box.  The value is stored in the strOpenArgs string:

txtValue1.SetFocus
strOpenArgs = txtValue1.Text


The next two lines of code after that reference the value of the second text box, and append it to the strOpenArgs string preceded by a semi-colon (the significance of the semi-colon will be explained in part 3 of this post):

txtValue2.SetFocus
strOpenArgs = strOpenArgs + ";" + txtValue2.Text


This is then repeated for the third text box:

txtValue3.SetFocus
strOpenArgs = strOpenArgs + ";" + txtValue3.Text


So at this point in the program flow, the value of strOpenArgs is as follows:

"one;two;three"

This is the final value of the DoCmd.OpenForm OpenArgs parameter which will be passed to the new form in the following line of code:

DoCmd.OpenForm "frmReceiveOpenArgs", , , , , , strOpenArgs


Part Two: Retrieving the Values

Let's take a look at the new form which opens after the SUBMIT button has been clicked, and the event procedure explained above has finished executing:

Above: the new form which opens in response to clicking the SUBMIT button.

As you can see in the screenshot above, the new form consists of three empty text boxes (for displaying retrieved values) and a RETRIEVE button.  When the user clicks RETRIEVE the text boxes will be populated with the values submitted from the first form.  In our case, Retrieved Value 1 will display the value "one", Retrieved Value 2 will display the value "two", and Retrieved Value 3 will display the value "three".

Let's look at what happens behind the scenes after the RETRIEVE button is clicked.  Like the first form, clicking the command button, which in this form is called btnRetrieve, results in it's ON CLICK event firing.  This starts the following VBA event procedure (see screenshot below):

Above: The VBA event procedure for btnRetrieve.

The code begins by declaring a string variable called strOpenArgs before referencing the forms OpenArgs property and storing its value in the string.  (Just to recap, the value of the OpenArgs property (ie "one;two;three") was determined by the OpenArgs parameter of the  DoCmd.OpenForm command invoked when the user clicked the SUBMIT button on the previous form):

dim strOpenArgs As String
strOpenArgs = Me.OpenArgs

The next couple of lines of code are very important. A string array called strValues is declared and has its elements populated with data returned from a function called getOpenArgsArray.  This function is located in a separate module called Utilities which is global in scope.  This is where the core of the processing is done for this exercise:

Dim strValues() As String
strValues = getOpenArgsArray(strOpenArgs)


The purpose of the getOpenArgsArray is to split the value of its parameter, strOpenArgs (which in our case is "one;two;three"), into three separate strings, with each array element containing an individual string.  So for us, the strValues array is populated with the following values:

Array ElementValue
strValues(0)"one"
strValues(1)"two"
strValues(2)"three"

These values are assigned to each of the three text boxes in the next six lines of code:

Me!txtRetValue1.SetFocus
Me!txtRetValue1.Text = strValues(0)

Me!txtRetValue2.SetFocus
Me!txtRetValue2.Text = strValues(1)


Me!txtRetValue3.SetFocus
Me!txtRetValue3.Text = strValues(2)


The end result can be seen in the screenshot below:

Above: the end result after the user clicks RETRIEVE.

In this way, we have used the DoCmd.OpenForm OpenArgs parameter to pass multiple values to a new form, thereby overcoming the limitation of only being able to pass a single string within the statement.


Part Three: The getOpenArgsArray Function

However, this post would not be complete without an explanation of the getOpenArgsArray function, as this is where the core of the processing was done for this exercise.  Let's take a look at the code used in the getOpenArgsArray function:

Above: code for the getOpenArgsArray function.
NB: in this screenshot the strArgs array is declared with 7 elements.
This is because the function is global in scope and other event procedures using
 the function may need addtional elements.  This means that the OpenArgs
 parameter of DoCmd.OpenForm can pass up to 7 values with this current setup.
If more elements are needed, the array can be declared with an adjusted number as necessary.

As mentioned in section 2 above, the purpose of the getOpenArgsArray function is to split the value of the strOpenArgs parameter passed to the function, into individual sections, and to save each section as a separate array element. So in our case, the function receives a string containing the value "one;two;three", and returns an array with three elements ie 


Array Element    
 Value  
Element 1 
 "one"
Element 2
 "two"
Element 3
 "three"

This is acheived by iterating through the strOpenArgs string in a FOR NEXT loop and appending each individual character to a temporary string called strBuildString.  Then when the current character of strOpenArgs in the loop is one of the semi-colons, the value of strBuildString is saved to a new array element. 

Lets break this down further.

The following three lines of code are concerned with iterating through each  character contained in the strOpenArgs string.  Each character is temporarily stored in a string variable called strChr:

For i = 1 To Len(strOpenArgs)
    Dim strChr As String
    strChr = Mid(strOpenArgs, i, 1)


The value of strChr is then checked to see whether or not it is a semi-colon.  If it is NOT a semi-colon, the character is appended to the strBuildString variable :

    If Not strChr = ";" Then
          strBuildString = strBuildString + strChr

If, on the other hand, the character IS a semi-colon, the current value of strBuildString is saved as a  new array element in strArgs().  The strBuildString variable is then cleared ready to build the value of the next array element:

         Else    
             strArgs(argCounter) = strBuildString

             strBuildString = ""

The element number of the array is kept track of in an integer variable called argCounter.  This is incremented by one after the strBuildString variable is cleared:

              argCounter = argCounter + 1
     End If


Next i

After the last iteration of strOpenArgs has completed, the final array element is saved, and the return value of the getOpenArgsArray function is set to the value of the strArgs() array:

strArgs(argCounter) = strBuildString
getOpenArgsArray = strArgs

Exit Function


Saturday, 2 June 2012

VBA Project Anatomy and Scope

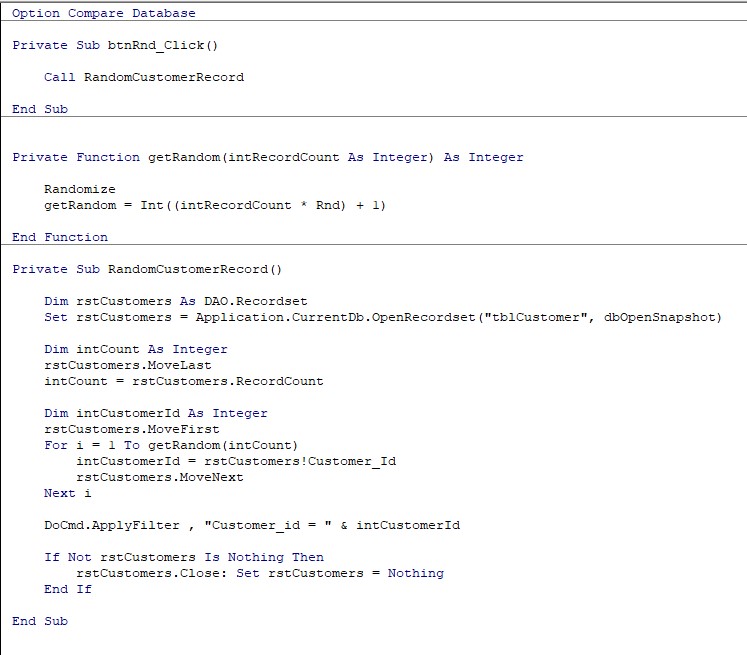
Last week I explained how to create an Access VBA Custom Function in a global module.  This was something of a departure from what I covered in previous blog posts.  All of the programming I had covered previously has been associated with a given form or report - what we refer to as a  Class Object.  In this post we are going to take a step back and look at the general structure of a VBA Project as a whole,  and in so doing we will examine the concept and workings of Scope.

VBA Projects
I have mentioned in the past that Access and VBA are two separate, albeit closely related, pieces of development software.  When we create an access database, a VBA project linked to that particular database is created for us automatically.  It is within this project that we create and store all the code relating to our database.

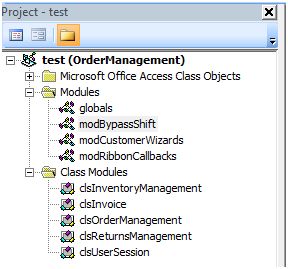
Figure 1: The VBA Project Explorer
showing folders for Class Objects, Modules and
Class Modules.

The VBA project consists of three main elements: these are class objects, modules and class modules. These can be viewed in tree diagram format via the VBA Project Explorer (see Figure 1 right).

Class Objects
Class Objects contain code relating to elements in a  form or report.  We covered these in some detail in the Learning Access VBA series of posts. As you may remember, code from class modules is generally triggered when a form or report event is triggered (for example, the OnCurrent Event is triggered when the user moves into a record displayed on a form).

Modules
Modules, on the other hand are not associated with any particular form or report, but do contain variables, sub procedures and functions that can communicate with them in various ways.  They are a convenient place to keep code which can be read, written to, or called from the class objects.  Moreover, when declared Public, any given variable, sub procedure or function within a Module can be accessed from many different class objects (and sub procedures within class objects) elsewhere in the project.  As such, modules help us organise and manage our code, thereby making our VBA project more logical and efficient. 

Lets elaborate on this further.  Suppose we have a sub procedure called deleteRecord stored in a module.  It purpose is to delete a particular record from a particular table when called.  The advantage of locating this code in a module is so different forms in the database can also make use of this same code.  So rather than  re-write the same section of code in each form, we write it once in a module, and call it whenever one of the forms needs to use it.  As such, we not only write less code, and save time in so doing, but we can easily maintain and modify that code since it is located in one module. That is to say, if we want to change how the  deleteRecord command button behaves in all the sharing forms, we only need update our code in one central place.

Class Modules
So far we have said little about Class Modules, the third main element of a VBA Project.  These are actually worthy of a complete series of blog posts in their own right (something which I may well do in the future). For now, however, let's just say they offer the programmer a way of creating their own custom objects made up of properties, methods and events.  Like conventional modules, class modules also help the programmer organise and manage code, but in a way that is potentially more complex and powerful.

Scope
With the partitioning of class objects, modules and class modules, VBA Projects have the potential to become very large and complicated.  On the one hand these different project 'zones' need to be self contained so something happening in one class module does not interfere with something happening in another elsewhere; yet on the other, they also need to exchange information and communicate.  This is where the concept of Scope comes in.

The concept of scope relates to the way in which different zones of a VBA Project partition the processing of data that occurs within and between each of those sections. We are going to illustrate how this works in relation to variables and sub procedure/function calls. Lets start with how variables behave within a form's object class.

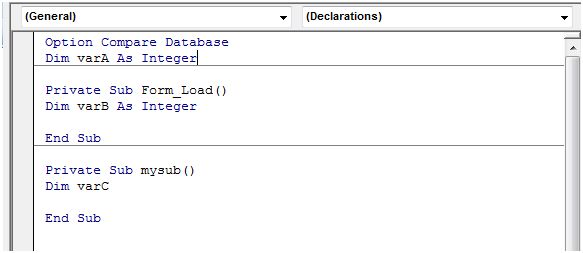
Figure 2:  A basic Class Object to illustrate Scope .

Variables and Scope
The screenshot in figure 2 shows a class object containing two sub procedures, Form_Load() and mySub().  A total of three variables are declared within the class object, two of which, - varB and varC  -are contained within sub procedures. VarA on the other hand is declared above both sub procedures in what is known as the General Declarations section.  The difference in positioning has a direct effect on the scope of each variable.  Let's examine this in more detail.

VarB is declared within the form's Form_Load() sub.  This means the scope of varB is local to this sub, and can only be accessed by code within it.  As such, we can can only read and write to this variable from within the same sub procedure in which it is declared. So, for example, if we assign a value to varB within the Form_Load() sub, we will not be able to read that value from code executed within mySub and vice versa.  This is what is meant by a local variable.

VarA on the other hand is written within the General Declarations section outside of any sub procedure.  The scope of any variable declared here is class object wide.  That is, it can be accessed from anywhere within it's own class object.  As such, we can assigned a value to varA in the Form_Load() sub, and then read that same value externally from mySub.  What we can't do, however, is access the variable from outside of this particular class object.  To do this we need to declare a Public Variable from a Module.

Public Variables
The scope of a public variable declared in a module is project wide - that is to say, it can be accessed from any class object, module or class module in the project.  Public variables are declared using the Public Statement (as opposed to the usual Dim Statement) in the module's General Declarations section (see Figure 3 below for an example).

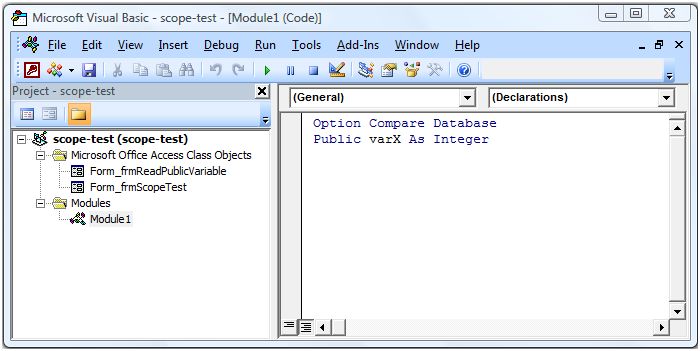
Figure 3: The shows the Public Variable, varX, in the General Declarations section of Module1.
As you can see, the VBA Project in Figure 3 contains two class objects (Form_frmReadPublicVariable and Form_frmScopeTest) and a module (Module1).  Since the variable varX has been declared with the Public statement in the General Declarations section of Module1, it can be accessed from both class objects.  As such we can assign a value to varX in the Form_frmScopeTest class object, and then read that same value some time later from a sub procedure in Form_frmReadPublicVariable.  However, the disadvantage of using public variables is that they make code potentially more difficult to debug, especially in large projects where the variable might be accessed from sub procedures in many different class objects, modules and class modules.  To some extent we could say that public variables undermine the code management advantages from working in a partitioned VBA project.  That said, they can be a really useful programming tool if used carefully.

Scope and Persistence
Before we move on to look at sub procedure and function calls, it is important to say something about the nature of scope and persistence.  In the context of scope, persistence is how long a value assigned to a variable lasts or persists.  How long, that is, before the variable value is lost and forgotten.  So, for example, if we assigned a value to a local variable declared within a sub procedure using the Dim Statement, that value will persist only as long as the sub procedure is running(1).  Once the sub has finished the value assigned to the variable no longer persists.  Likewise if a variable is declared within the general declarations section of a form class object, any value assigned to the variable will only persist whilst that form is still open.  Once closed the value is lost. Of course it is public variables which have the greatest persistence.  Any value assigned to one of these will last until the database application is closed.

(1) There is an exception to this rule.  We can declare the variable using the Static Statement instead of Dim.  Doing so enables the value to persist, but only within the sub where it has been declared.  The next time that particular sub executes, the previous variable value is remembered and can be read by code (providing that code is still within the same sub).

Scope and Sub Procedure / Function Calls
If you read my post on Writing Custom Functions for Access VBA last week, you may already be familiar with the concept of calling a function.  You may recall how the myPercentage function located in an external module was called from a sub procedure within a form's class object.  You may also recall how we passed three parameters to that function.  The significance of being able to pass parameters in this way, is very important from the perspective of scope.  That is to say, if the calling sub procedure needs to share a local variable with the called function or sub, passing local data in the form of a parameter enables us to bypass the issue of scope.  As such, parameters are a way of letting various parts of the VBA project share information and communicate without compromising the real need to keep the project strictly partitioned in an organised manner.

Lets examine a simple example of how passing a parameter, this time in a sub procedure call, can bypass the issue of scope:

Private Sub Command9_Click()
    Dim varThis As Integer
    varThis = 10
    Call thatSub(varThis)
End Sub


Private Sub thatSub(argReceived As Integer)
    MsgBox ("The argument received is: " & argReceived)
End Sub


Here we have two private sub procedures within the a form's class object.  When the user clicks a command button, the Command9_Click sub procedure begins to run.  It defines a local variable called varThis and assigns it with the integer value 10.  The next line calls the thatSub sub procedure, passing the local variable varThis as the parameter.  This call results in the execution of thatSub.  Notice how the first line of thatSub contains the code argReceived As Integer within brackets.  This is where the passed parameter (varThis) is received by the called sub procedure.  The parameter which has been passed is now referred to as an argument, and it's value can be accessed from code within the receiving sub procedure.  As such, when the second line of code in thatSub runs, a message is displayed ending with the value contained in argReceived (see figure 4 below).  

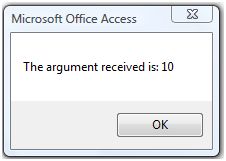
Figure 4: The message displayed from the
 MsgBox method in thatSub.
We see, therefore, that the value contained in what is a local variable has been passed to a different sub procedure which would otherwise have been outside that variable's scope.

Conclusion
In this post we have seen how the VBA project is partition into various zones, and how those zones are largely self contained in terms of data processing.  This partitioning is maintained via a set of rules collectively known as scope, the advantage of which is the management of code within the project.  Since there is a legitimate requirement for these zones to exchange information, the working of scope can be bypassed in a managed manner through the passing of parameters and receipt of arguments.