Showing posts with label DAO. Show all posts

Wednesday, 21 February 2024

Display a Random Customer Record using VBA and Form Filter

Suppose you are responsible for managing an Access Database containing customer records.  You have been asked to introduce a contact management feature whereby the person operating the database can extract a random customer record.  This blog post walks you through the VBA code needed to generate a random number and use it to filter out a customer record, all at the click of a form button.

In order to demonstrate this we will be using the following data:


Table of Fictitious Customer Records


We will display the random customer record on the following form:


The VBA code starts when the user clicks the "Get Random" button to display a random customer record on the form. Lets begin by creating the control button.


Creating the Control Button

1. Open the form in DESIGN VIEW
2. Click the BUTTON icon in the CONTROLS group on the FORM DESIGN ribbon.
3. Click the location on the form grid where we will be positioning the button.  Resize the control button by clicking on one of the buttons' corner or edges and dragging to enlarge or contract as appropriate.
4. Click the PROPERTY SHEET icon from the TOOLS group of the FORM DESIGN ribbon if it is not already open.
5. Ensure the control button is selected. Click the button to select if it is not. Now the property    sheet is displaying the properties specific to our button.
6. Change the button CAPTION property on the FORMAT tab to "Get Random".
7. Change the button NAME property on the OTHER tab to "btnRnd"

Check how the button looks by changing  to FORM VIEW from the VIEWS group of the FORM DESIGN ribbon. If its OK, we are now ready to add the VBA code which runs when the command button is clicked.


Adding the VBA Code

1. Open the form in DESIGN VIEW, and reopen the PROPERTY SHEET if it isn't already.
2. Select the control button by clicking on it.
3. Select the EVENT TAB on the PROPERTY SHEET, and click inside the grid cell adjacent to where it says ON CLICK.
4. Click the ellipse button ("...") at the end of the cell to open the CHOOSE BUILDER dialog, Select CODE BUILDER from the drop down list and click OK to open the VBA editor.
 

You should now see an empty sub procedure called btnRnd_Click(). This is the control button's event handler.  This means the code we enter here will run when the user clicks the command button at runtime.


The VBA to Generate a Random Number

In order to retrieve a random customer record we need to generate a random number which corresponds to one of the customers in the database table. We can do this using an inbuilt VBA function called Rnd.  This generates a random decimal number between 0 and 1. For example, it  may return the value 0.5924582.  For this to be of any use to us, we need change the decimal number to an integer and multiply it by the number of customer records in the table.  So, for example, our table contains 10 customer records so we need to multiply the value returned by rnd by 10 and use another function called int to convert it from decimal to integer. We do this as follows:

    Int(rnd * 10)

This returns a value between 0 and 9.   We now need to add 1 to the value to get a number between 1 and 10:

    Int(rnd * 10)+1

Just one more thing to note: computers are unable to return a true random number on their own.  They return a seed number based on a pre-existing sequence of numbers. However, when we initialize the random number generator with the Randomize statement, the seed number returned is based on the system timer, which effectively makes the returned value a true random number.

So to put all this together we are going to create our own custom function to return a random integer number based on the number of records in our database table. The number returned will correspond to a particular record in the table. We shall call our function getRandom and will pass the number of customer records as the parameter. The code for the function is as follows:


Private Function getRandom(intRecordCount As Integer) As Integer  
    Randomize
    getRandom = Int((intRecordCount * Rnd) + 1)  
End Function

For more information on how custom functions work, please check out my post on Writing Custom Functions for Access VBA.

The next step is to write the VBA code to connect the random number returned by our getRandom function with it's corresponding customer record in the database table.  We shall do this by looping through a DAO Recordset containing records from the customer table.


Looping through the DAO Recordset


Before we can create the code to filter a customer record based on our random number, we need to find a way of mapping any potential number returned by the getRandom function  (in our case this is between 1 and 10) against the records in the database table. Whilst it is tempting to use the returned random number directly against the value stored in the customer_id field in a form filter WHERE clause - ie "customer_id = " & getRandom(intRecordCount) - there is a problem with this.  That is to say, although the customer id's in our table go up in an unbroken sequence from 1 to 10, it is possible that one of these records will be deleted in the future.  If and when this happens, no customer record would be found using the above WHERE clause if the random number corresponded to the deleted record. Moreover, the record count would not include the deleted record so the random number returned would be within a range which did NOT include the last record in the table.

What we must do, therefore, is create a DAO Recordset containing all the records in our customer table and use the value returned by getRandom to step through each customer record in the set until this value has been reached - eg if getRandom returns the value 8, we simply loop though the recordset to the 8th record contained therein.  Once we get to this record we can look up the actual value in the customer_id field, and then use this as the basis of our form filter WHERE clause.

If you are unfamiliar with how DAO recordsets work, you may want to check out my post on Accessing Data with VBA Code - Introducing the DAO Recordset; otherwise, lets jump straight in, and run through the code we will be using.

The first step is to create a new instance of a DAO recordset object and set its value to that of our  tblCustomer table.

Dim rstCustomers As DAO.Recordset
Set rstCustomers = Application.CurrentDb.OpenRecordset("tblCustomer", dbOpenSnapshot)

You may have noticed the second parameter we have used when opening the recordset is dbOpenSnapshot.  This means our recordset will be a static snapshot of the customer table. Unlike the versatile dbOpenDynaset type, records cannot be updated using dbOpenSnapshot, but in cases where editing is not required, the snapshot type is the more efficient option. 

In the next step we are going to count the number of records in the rstCustomers recordset and store the value in an integer variable called intCount.  To count the number of records in rstCustomers we will read the RecordCount property using the following syntax:  rstCustomer.RecordCount.  However, before doing so, it is first necessary to visit all the records in the recordset so they can all be counted. The best way to do this is to use the recordset MoveLast method which moves the recordset cursor though each of the records before pointing to the last record in the set. The syntax for this is rstCustomers.MoveLast. All this is done in three lines of code as follows:

Dim intCount As Integer
rstCustomers.MoveLast
intCount = rstCustomers.RecordCount

Now that we know how many records are in the customer table, we can use our getRandom function, passing intCount as the parameter, to obtain a random number.  We then step through the records in the recordset until we reach this number.  Once this record has been reached, we can read the value contained in the customer_id field.  

To do all this we shall begin by defining an integer variable called intCustomerId.  This will be used to store the customer id once we have arrived at the random customer record.  Before we set up the loop, we need to move the recordset cursor back to the first record using the MoveFirst  method.  This is because the cursor is still at the last record from when did the record count in the section of code above.  We will use a For...Next loop to step through the recordset, starting at the first record and ending at the record which corresponds to the value returned by our getRandom function. This is done with the following line of code: For i = 1 To getRandom(intCount).  The first statement within the loop sets the value of the intCustomerId variable to the value contained in the customer_id field of the record where the recordset cursor is located. We reference the field value using the recordset name ("rstCustomers") followed by an exclamation mark ("!") and then the field name ("Customer_Id") as follows: intCustomerId = rstCustomers!Customer_Id. Once this value is stored in our intCustomer variable we can move the recordset cursor to the next record using the MoveNext method: rstCustomers.MoveNext. Finally the loop counter is incremented by 1 with Next i.  If the end value of the loop counter had been reached before the Next statement had executed, the loop counter will still increment by 1, but the program flow will exit the loop and move to the statement following Next i.  

Dim intCustomerId As Integer
rstCustomers.MoveFirst
For i = 1 To getRandom(intCount)
           intCustomerId = rstCustomers!Customer_Id
           rstCustomers.MoveNext
Next i    


So we have stepped through the recordset and arrived at our random record storing the value of it's customer_id field in the intCustomerId variable.  Now the program flow has exited the loop we are going to use the intCustomerId value to display the record on our form.  This will be done by means of a form filter containing a WHERE clause based on the stored customer_id. The syntax for the WHERE clause is "Customer_id = " & intCustomerId and the syntax to create form filter is DoCmd.ApplyFilter filtername, whereclause, controlname.  Although the ApplyFilter method has three parameters, we are just going to use the second - the WHERE clause.  As such we write the full statement as follows:

DoCmd.ApplyFilter , "Customer_id = " & intCustomerId

(NB Although the first parameter is left blank we still need the separating coma just before the WHERE clause string.  The last parameter is also left blank, but a separating coma after the WHERE clause is not needed.)

Lastly we need to close the rstCustomer recordset and set its value to NOTHING.  This clears the memory that it had been taking up and allows us to reopen the recordset again the next time the user clicks the getRandom button. We place this code within a IF conditional statement which checks the recordset is still open before it executes thereby avoiding any error from occurring if it is not.

If Not rstCustomers Is Nothing Then
    rstCustomers.Close: Set rstCustomers = Nothing
End If


All we need to do now is look at how all the code we have run through above is organised in the code module for the frmCustomer form.


As you can see from the screenshot above, our code is divided into two Sub Procedures and one Function, btnRnd_Click(), RandomCustomerRecord() and getRandom() respectively.  When the user clicks the Get Random button on the Customer Form, the code in the btnRnd_Click() sub executes first. This is the event handling sub that Access created automatically when we set up the control button at the start of the tutorial.  There is just one statement here calling the second sub procedure which is RandomCustomerRecord().  This contains the main body of the code for retrieving the random customer record from the database and displaying it on the form.  The reason for giving this it's own sub rather than placing it in the code handler, is that we can potentially reuse this code by calling it from different locations in the program as required.  The only task this code does not do is generate the random number representing a specific customer record for selection.  This code is located in the getRandom() Function which is called from the FOR statement of the FOR...NEXT loop. The number returned from the function determines how many records are stepped through in the rstCustomers recordset before getting to the record which is to be displayed right at the end of the process.

Once RandomCustomerRecord() has the random number and retrieved the customer record from the recordset, the form filter is applied using the value of cutomer id.  The form will then display the record with the same customer_id as that stored in the sub's intCustomerId variable.


And there we have it: a random customer record at the click of a button! 


Friday, 23 March 2012

The DAO Recordset in Action - An Example Lending Library Database

Last week I wrote a post on How to Access Data with VBA Code.  Instrumental in this was the use of the DAO Recordset Object.  Through using this object we were able to add, find, edit and delete records from an Access Database table or query. This week I am going to provide a working example of how the DAO Recordset is used in an actual database application.  In order to do this, I have created part of a Lending Library Database for demonstration purposes. This can downloaded by clicking the link.

The Lending Library Database
The table at the centre of this database is the Loans table (jnkLoan).    As you can see from figure 1, it is a junction table (from a Many to Many Relationship) which contains the foreign key from both the Library Users table (tblLibraryUser) and the Library Stock Table (tblLibraryStock).  The purpose of tblLoans is to store the details of each loan transaction whereby a library user borrows or returns an item of library stock.  

Figure 1: The table relationships from the Lending Library Database
Figure 2 below shows the Library User Account Form where these loan transactions are made.  Transactions are occur when the user enters a number into the ITEM BARCODE text box, and clicks the ISSUE or DISCHARGE command button.  This then runs a VBA sub procedure which uses the DAO Recordset to create a loan record in tblLoan.

Figure 2: The User Account form. Library items are issued and discharged from here.

The User Account Form also has an On Loan subform to list items out on loan to the library user.  The RECORD SOURCE for this subform is qryLoansSub, and contains fields from the jnkLoan, tblLibraryStock, and tblBook tables.  There is a criteria value of Is Null on the ReturnDate field.  As such, any loan transaction without a ReturnDate (belonging to the UserBarcode from the parent form) is listed as being On Loan.  Moreoever, the VBA code initiated by the ISSUE and DISCHARGE buttons ends with a line to requery the subform.  This ensures the subform updates as soon as a stock item is issued or discharged.

Issuing an Item
So lets have a look at the VBA code which runs when the ISSUE button is clicked:

Private Sub cmdIssue_Click()
On Error GoTo trapError
    Dim rstLoan As DAO.Recordset
    If IsNull(DLookup("StockBarcode", "tblLibraryStock", "StockBarcode = " & Me!txtIssueBarcode)) = True Then
        MsgBox "Sorry - Barcode Does Not Exist", vbInformation, "Invalid Barcode"
        GoTo leave
    Else
        Set rstLoan = CurrentDb.OpenRecordset("jnkLoan", dbOpenDynaset)
        rstLoan.FindLast "StockBarcodeFK = " & Me!txtIssueBarcode
        If rstLoan.NoMatch = False Then
            If IsNull(rstLoan!returndate) = True Then
                MsgBox "Book Is Already On Loan.  Please discharge before Issuing.", vbExclamation, "Already On Loan"
                GoTo leave
            End If
        End If
        rstLoan.AddNew
            rstLoan!StockBarcodeFK = Me!txtIssueBarcode
            rstLoan!UserBarcodeFK = Me!UserBarcode
            rstLoan!IssueDate = Date
            rstLoan!DueDate = DateAdd("d", 30, Date)
        rstLoan.Update
        Me!subOnLoan.Requery
        Me!txtIssueBarcode = Null
        DoCmd.GoToControl "txtissuebarcode"
    End If
leave:
    If Not rstLoan Is Nothing Then
        rstLoan.Close: Set rstLoan = Nothing
    End If
    Exit Sub
trapError:
    MsgBox "Error " & Err.Number & ": " & Error$
    Resume leave
End Sub


The code begins by checking that the item barcode actually exists, and is not, therefore, a data entry error. This is done using the DLookUp function on the StockBarcode field of tblLibaryStock.  If it does not exist, a warning message is displayed, and the sub procedure comes to an end.  If it does exist, the code continues to open a DAO Recordset object based on jnkLoan.  This is then searched using the FINDLAST method of the recordset object to find the most recent transaction involving that particular item.  If a record is found, the ReturnDate value is checked to make sure the item is not recorded as already being on loan (it is an not an uncommon human error for some items to be shelved without first being discharged).  If the item is recorded as being On Loan  an error message is displayed asking the staff member to discharge the book before re-issuing.  The procedure then comes to an end.  If there had not been a previous transaction for that item, or if the previous transaction has a ReturnDate value, the code continues to create a new record in jnkLoan.  

The following block of code (a section extracted from the main code above) is where the new record is created:

 rstLoan.AddNew
            rstLoan!StockBarcodeFK = Me!txtIssueBarcode
            rstLoan!UserBarcodeFK = Me!UserBarcode
            rstLoan!IssueDate = Date
            rstLoan!DueDate = DateAdd("d", 30, Date)
  rstLoan.Update

Here the AddNew method of the Recordset Object is called to create the new record.  Then the StockBarcodeFK field is set to the value of the Item Barcode textbox; the UserBarcodeFK field is set to the value of the UserBarcode on the User Account Form; the IssueDate field is set to the current date via the Date function; and the DueDate field is set to 30 days from the current date via the DateAdd function.  The changes made to the rstLoan Recordset are then saved back to tblLoan via the recordset object's Update method. Finally the code re-queries the OnLoan subform, puts the focus back on the Item Barcode textbox, and closes the recordset.

Discharging an Item
The sub procedure which runs when a book is discharged is very similar.  The main difference is that rather than creating a new loan transaction record, the last loan transaction record is found, and then edited by putting the current date in the ReturnDate field.   Here is the discharge code:

Private Sub cmdDischarge_Click()
On Error GoTo trapError
    Dim rstLoan As DAO.Recordset
    If IsNull(DLookup("StockBarcode", "tblLibraryStock", "StockBarcode = " & Me!txtIssueBarcode)) = True Then
        MsgBox "Sorry - Barcode Does Not Exist", vbInformation, "Invalid Barcode"
        GoTo leave
    Else
        Set rstLoan = CurrentDb.OpenRecordset("jnkLoan", dbOpenDynaset)
        rstLoan.FindLast "StockBarcodeFK = " & Me!txtIssueBarcode
        If rstLoan.NoMatch = False Then
            If IsNull(rstLoan!returndate) = False Then
                MsgBox "Book Not On Loan.", vbExclamation, "Already On Loan"
                GoTo leave
            End If
        End If
        rstLoan.Edit
            rstLoan!returndate = Date
        rstLoan.Update
        Me!subOnLoan.Requery
        Me!txtIssueBarcode = Null
        DoCmd.GoToControl "txtissuebarcode"
    End If
leave:
    If Not rstLoan Is Nothing Then
        rstLoan.Close: Set rstLoan = Nothing
    End If
    Exit Sub
trapError:
    MsgBox "Error " & Err.Number & ": " & Error$
    Resume leave
End Sub

If you would like to try all this out, please feel free to download the sample Lending Library Database. You can view a list of library item barcodes to work with by clicking the LIBRARY STOCK command button at the top of the User Account Form.

Friday, 16 March 2012

Accessing Data with VBA Code - Introducing the DAO Recordset

This post is all about how we can use VBA code to access the data stored in our database.  By access, I mean, being able to add, find, edit or delete records.  In so doing we are effectively automating data access thereby enabling us to create some very powerful database applications.

Creating a Reference
To do this we are going to make use of Data Access Objects (DAO) which is contained in the Microsoft Office 12 Access database engine Object Library.  The very first thing we must do is create a reference to this library if it does not already exist.  The procedure for doing this is really quite simple:
  1. Open the VBA Editor.
  2. Open the TOOLS menu.
  3. Select REFERENCES from the TOOLS menu.
  4. When the REFERENCES dialog form opens, check to see whether Microsoft Office 12 Access database engine Object Library has a tick against it.  If it has it should be towards the top of the list (all checked references appear above the others, and those that are not, appear in alphabetical order below).
  5. If the library mentioned in stage 4 is not ticked, you will need to scroll down the list to find it, and then tick the check box.
  6. Click OK to close the dialog form.
The reference has been created and you are now ready to start using Data Access Objects.


Introducing the DAO Recordset
The DAO Recordset is basically a VBA object which enables us to gain access to information stored in database tables or queries via code.  It is VBA's representation of the table or query, and we make use of the methods and properties of the DAO Recordset to manipulate the data that it contains.

The first coding task we have to perform is to create an instance of the recordset object.  This is then stored as an object variable. We do this with the following line of code:

Dim rstNameList as DAO.Recordset

This creates an object variable called rstNameList.    Our the next task is to set the value of  this object variable. This effectively means that we are setting  rstNameList to represent a particular table or query in our database.  This is done as follows:

Set rstNameList = Application.CurrentDb.OpenRecordset("tblNames", dbOpenDynaset)

This line of code sets the value of object variable rstNameList to a DAO Recordset based on a table called tblNames.  This is done by using the OpenRecordset method of the Recordset Object.  This is applied against an object reference to the current database - hence our use of the CurrentDb method of the Application object preceding OpenRecordset.  Don't worry if this sounds confusing, just remember to enter the name of your table or query as the first parameter of the OpenRecordset method.  The second parameter, dbOpenDynaset simply opens the recordset as a Dynaset type (which is a particularly versatile type).  

We can now apply the methods and properties of the Recordset class against the object variable rstNameList. As we do so, remember that they are acting on a virtual representation of the database table or query being used.  Lets look at how we can add a record to our table via rstNameList:

Adding Records
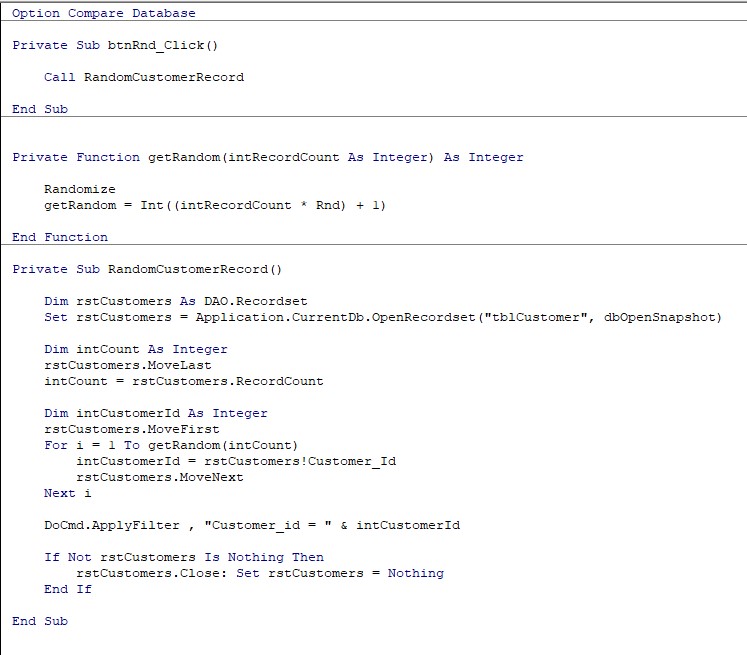
Imagine our table is comprised of four fields: Id, FirstName, Surname, and DOB (ie date of birth).  This is the data our table currently holds:

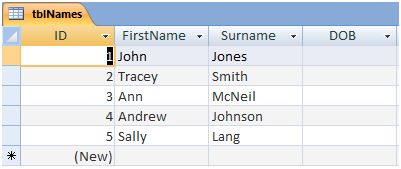
Figure 1: Table data from tblNames.
The rstNameList Recordset Object is based on this table.

The following code is designed to add a new record for a person called Graham Bell:

Private Sub cmdAdd_Click()    
    Dim rstNameList As DAO.Recordset
    Set rstNameList = Application.CurrentDb.OpenRecordset("tblNames", dbOpenDynaset)
    
    rstNameList.AddNew
        rstNameList!FirstName = "Graham"
        rstNameList!Surname = "Bell"
        rstNameList!DOB = #7/10/1970#
    rstNameList.Update
    
    If Not rstNameList Is Nothing Then
        rstNameList.Close: Set rstNameList = Nothing
    End If   
End Sub 

Lets go through this:

This code is triggered when a command button called cmdAdd is clicked by the user.  The code then declares an object variable called rstNameList which is subsequently set to a Recordset based on tblNames.  

The central block of code calls the AddNew method of the Recordset object.  This basically signals that a new record is going to be added to the recordset.  The next three lines reference the FirstName, Surname and DOB fields, setting their values respectively.  As such the FirstName field value is set to "Graham", Surname to "Bell", and DOB to 7/10/1970.  Note the FirstName and Surname fields are of the STRING data type, so are consequently enclosed within quotation marks ie ""; whereas the DOB field is of the DATE data type so is enclosed between hash marks using the American Date Format ie #mm/dd/yyyy#. (Had we used the number data type this would not have needed to be enclosed by anything). Finally the central block of code saves the new record by calling the Update method of the Recordset object.

The final block of code simply closes the recordset object and destroys the object variable reference so as not to use unnecessary memory.

You can now go back to the original table tblNames, and click Refresh to see the new record:

Figure 2: The tblNames table after new record is added via VBA Code.
As you can see, the new record has been added at the bottom of the table.  Note that we did not need to set the value of the ID field as this is of the AUTONUMBER data type and is added by Access automatically.

Editing Records
The code for updating a particular record is very similar to the central block of code in the in the previous example.  The main difference is, however, that we must find the record prior to making any changes.  To do this we are going to use the FindFirst method of the Recordset object.  The syntax for this is as follows:

 rstNameList.FindFirst "Id = 5"
Notice that this method passes the parameter "Id = 5".  This is basically an SQL WHERE clause without the WHERE keyword.  It tells access to find the first record in the recordset where the value of the ID field is 5.  There is more information on SQL Where in my Gentle Introduction to Access SQL. Just remember that the parameter must be enclosed within quotation marks, so if the value searched for is itself a string, you must not only enclose the parameter within quotation marks ie "", but you must also enclose the actual value to be found within single quotation marks ie ' '. For example if you wanted to search for the surname Lang, the syntax would be:

rstNameList.FindFirst "Surname = 'Lang' " 

It is also possible to test whether a record has actually been found using the NoMatch property of the Recordset object as follows:

If rstNameList.NoMatch = false Then
    .... code to run if record is found. 
Else
    ....code to run if no record is found.  
End if

Once we have found the record, we can then go on to edit any, or all, of its fields.  This is done with the following code:

rstNameList.Edit
        rstNameList!DOB = #8/10/1970#
rstNameList.Update

Notice how we have used the Edit method of the Recordset object instead of AddNew.  The rule is use Edit if you want to edit an existing record, and use AddNew if you want to create a new record.  Once the record has been edited it needs to be saved using the Update method as before.  So lets look at the whole code snippet:


Dim rstNameList As DAO.Recordset
Set rstNameList = Application.CurrentDb.OpenRecordset("tblNames", dbOpenDynaset)
    
    rstNameList.FindFirst "Id=5"
    If rstNameList.NoMatch = False Then
        rstNameList.Edit
            rstNameList!dob = #8/10/1970#
        rstNameList.Update
    End If
    
If Not rstNameList Is Nothing Then
    rstNameList.Close: Set rstNameList = Nothing
End If


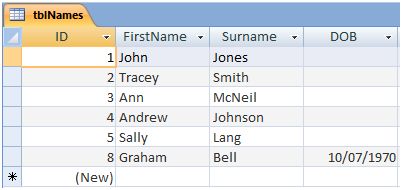
If we refresh the data in tblNames, you can see that our code has put a DOB value in Sally Lang's record:

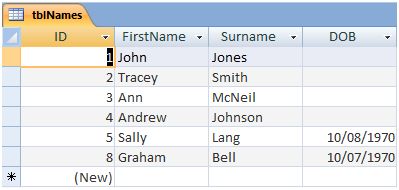
Figure 3: The record of Sally Lang (ID 5) now has a DOB value
after her record was edited with our code.
Deleting Records
When it comes to deleting a record, we start by finding the particular record that we want to delete.  Again this is achieved using the FindFirst method of the Recordset Object.  So suppose we wanted to delete Graham Bell's record, we could do a FindFirst search on his record ID which is 8.

rstNameList.FindFirst "Id = 8" 

All we do then is apply the Delete method of the Recordset Object as follows:

rstNameList.Delete 

Again, it is a good idea to nest the above line in an If ...Then... Else statement to test that a matching record has been found.  As such the full code to delete record 8 is as follows:

Dim rstNameList As DAO.Recordset
Set rstNameList = Application.CurrentDb.OpenRecordset("tblNames", dbOpenDynaset)
    
rstNameList.FindFirst "Id=8"
If rstNameList.NoMatch = False Then
    rstNameList.Delete
Else
    MsgBox "Record Not Found"
End If
    
If Not rstNameList Is Nothing Then
    rstNameList.Close: Set rstNameList = Nothing
End If


The record has now been removed from the table:
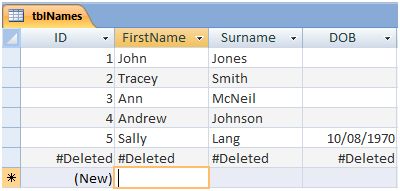
Figure 4: Our code has deleted the intended record.

These have all been basic examples to demonstrate how we can access and manipulate data using VBA code.  How we use the Recordset object in a real database application depends entirely on what needs doing. I have found the possible uses of the DAO Recordset to be virtually endless. It is an extremely   powerful tool to draw upon when needed.  As such, I hope to show some applied examples of its possible uses in a future post.

Sunday, 10 July 2011

Dealing With a Combo Box Entry that is "Not In List"

Following on from my last post on Customizing an Access Combo Box, this tip is about dealing with a Combo Box Entry that is Not In List.  Basically this occurs when instead of selecting an item from the Combo Box list, the user manually types in an entry that is not one of the items from the drop down list. It works by running a small section of VBA code when the Combo Box NOT IN LIST Event fires (more about this later).  The code then creates a new record containing the user's entry in the table upon which the combo box list is based.

Let's use the example of a Combo Box on a Products Form to illustrate this.  The Combo Box is used in this example to enter the Category field of the Product record.  The Record Source of the form is tblProducts, and the Row Source of the Combo Box is tblCategory.  If you want to run a copy of this example, you can download the Not In List Example Database by clicking the link (you will need to Enable the Content if you save it a location that is not trusted).

Figure 1: The Products form with a Combo Box on the Category field.

As you can see from Figure 1 above, the Category field uses a Combo Box with a list of potential categories.  These are stored in a separate table called tblCategory, which is the value of the Combo Box ROW SOURCE property.  The screen shot shows that there are three categories - Office Equipment, Office Furniture, and Stationery.  So what happens if the user wants to create a new product record, for say, a software package? There is no existing category for Software, so once the user enters the product name - lets say it is MS Office Access 2010 - he or she is unable to select a suitable category from the drop down list.

Now might be good time to mention the Combo Box LIMIT TO LIST property (located in the DATA TAB of the PROPERTY SHEET).  When this is set to YES (which is the case in our example), Access would normally display an error message saying THE TEXT YOU ENTERED IS NOT AN ITEM IN THE LIST; it then asks the user to select an item which is, or type in text that matches one of the listed items. This message is show in Figure 2 below:

Figure 2: The default message shown when an item is not in list.
However, when LIMIT TO LIST is set to yes, Access first fires the NOT IN LIST event. This enables us to pre-empt the standard message by writing code to display a custom message of our own.  This code also gives the user the opportunity to add the new Category to the table which is the row source for the combo box list.

Let's take a look at the code used in our example database.


Private Sub ctlCategory_NotInList(NewData As String, Response As Integer)
On Error GoTo myError
    
    Dim rst As DAO.Recordset
        
    Set rst = CurrentDb.OpenRecordset("tblCategory", dbOpenDynaset)
    
        If vbYes = MsgBox("This Entry is not in list. Do you wish to add " _
                & NewData & " as a new category?", _
                vbYesNoCancel + vbDefaultButton2, _
                "New Category") Then
                
            rst.AddNew
                rst!categoryName = NewData
            rst.Update
            
            Response = acDataErrAdded
            
        Else
        
            Response = acDataErrContinue
            
        End If
       
leave:

    If Not rst Is Nothing Then
        rst.Close: Set rst = Nothing
    End If
    
    Exit Sub
    
myError:
   
    MsgBox "Error " & Err.Number & ": " & Error$
    Resume leave
    
End Sub

We enter this code into the Visual Basic Editor by clicking the three dot symbol on the far right of  ON NOT IN LIST (located on the EVENTS Tab of the Combo Box's PROPERTY SHEET).  The CODE BUILDER option was then selected from the CHOOSE BUILDER Dialogue Box.

Figure 3: The EVENTS Tab of the PROPERTY SHEET.

So how does the code work?

The first line of code was created automatically by Access when the VBA editor was opened via the ON NOT IN LIST line of the property sheet.  There are two arguments enclosed within the brackets - NewData and Response.  The first of these contains the new category value just entered by the user as a string variable.  The later relates to how access is going to handle the Not In List Event.  It's default value is 0 which represents the standard way of doing so ie displaying the error message and preventing the user from adding the new data.  Needless to say, we are going to alter this value later on in the code!

The third and fourth line of code relates to the object variable rst which represents a DAO recordset based on tblCategory, the Row Source of our Combo Box list.  Object variable rst is first declared in the Dim Statement, and then Set to tblCategory via the openrecordset method of the database object.

The fifth line of code relates to the custom message displayed to the user when he or she enters an item that is not in list.  The msgbox function displays our message as well as determining which buttons are offered, which button is the default, and the msgbox title.  The user response, ie the button the user clicks, is then processed by the If statement - so if the user clicks YES, the code branches to the code below where a new category record will be added.

This new category record is added using the addNew method of the Recordset Object.  The categoryName field is then set to the value of the NewData variable- ie the value of the new category entered by the user which was passed by Access as a parameter to the sub.  The new record is then saved to tblCategory using the Update method of the Recordset Object.

The next line of code changes the value held in the response variable (passed by Access as a parameter in the first line of the sub) via the acDataErrAdded constant.  Doing so tells access that new data can be added to the Combo Box list, and not to display the default Not In List error message.  It also Requeries the Combo Box list so that the new data appears immediately.

However, if the user had clicked the NO or CANCEL Command button mentioned above, the program flow branches to the Else Statement where it goes on to run the line of code changing the value held in the Response variable via the acDataErrContinue constant.  This tells Access not to add the new data to the Combo Box list, but continue without displaying the default Not In List message.

After the End If statement the program flow converges once again.  The last section of code (before the error handling section) deals with closing the rst Recordset Object and re-setting its value to nothing.  The sub's program flow then exits the sub via the Exit Sub statement.